Dan Friedman
Voice Over Coach & Demo Producer
828.551.0891
[email protected]
  • Home
  • About
  • Demos
  • Coaching4VO
  • Books
  • Services
  • Testimonials
  • Sound4VO Blog
  • Merch
  • Contact

Studio & Gear

Voiceover Gear, Quality and Rates… a Correlation?

August 13, 2011 by Dan Friedman

home studio, Dan Friedman, correlationTwo of the biggest ongoing issues in the voiceover world are gear and rates. It seems that voice talent (or voice talent wannabes) are always looking for the latest, greatest, smallest and cheapest piece of gear that is good enough to record audio. They also seem to want the ability to do this from just about anywhere. The issue of rates is always a big concern. Job offers for payments that fall considerably short of generally accepted rates frequent the internet. These offers are often discussed as being reprehensible or even laughed at on social media. So, is there a correlation between cheap gear and low rates?

Portability and the ability to respond quickly to client requests are key factors that drive the need for much of this gear. The desire to provide for clients is essential to your VO business and let’s face it, the gear is often pretty cool and some of it sounds quite good. But the environment plays a much bigger role in your overall sound and just because you can record from your car or a hotel room, doesn’t mean you should. Other than your voice and performance, nothing has a greater effect on your sound than the environment you’re in.

Consistency and quality are critical for great sounding productions. These can only be guaranteed when the environment is a professional one, usually a professionally equipped recording studio or home studio. Consistency is especially critical when it comes to revisions. Even musicians, who are the largest consumers of recording gear, know that most of this low-end gear is for laying down ideas and for doing pre-production. When they are ready to make an album, serious musicians will usually go to a professional recording studio.

One of the biggest complaints about the voiceover industry, from those who are in it, is that so many people think that voiceover is easy and anyone can do it. Well, it should come as no surprise that when people brag about recording from their car, on their smart phones and through the multitude of cheap pieces of plastic that are now available at the megastore down the street, outsiders may believe that this is not all that difficult. Newbies don’t always understand performance or quality, but they usually understand the concept of making money from anywhere for very little investment.

On the flip-side, clients who (to their detriment) don’t always care about quality are not going to offer higher rates if they think the job can be done anywhere and/or with nothing more than a USB microphone plugged into a laptop. Clients who know better are usually willing to pay for the quality and service that come with a professional talent, who records in a professional environment, on professional gear. They understand that, just like in their own businesses, to be among the best requires an investment in time and money. Clients can justify higher talent payments more easily when they know that the audio will be professionally recorded and will be consistent from one session to the next.

Having higher-quality equipment and a proper recording space helps you to justify demanding a higher price for your work. Good clients understand the correlation between your investment in training and gear and the value that results.

If you are a voiceover talent, who loves and respects this industry, you will hopefully continue to work towards providing the highest quality audio possible and consistency from one session to the next. This doesn’t mean that you should not provide for your clients in emergency situations… you should. It also does not mean that you must have the most expensive pieces of gear. It simply means that you will continue to seek out the best equipment for you and your situation until you reach the point that any change would not provide a significant improvement. Do not stop at “good enough.”

Filed Under: Studio & Gear Tagged With: audio, Dan Friedman, home studio, microphone, Recording, USB microphone, voiceover, voiceover talent

Recording Magazine’s Room Acoustics Series Part 3

August 1, 2011 by Dan Friedman

Recording Magazine sends out a newsletter to its subscribers every few weeks. The newsletter is (coincidentally) titled “Sound Advice” and this month it features the third in a series about room acoustics. Room acoustics is one of the biggest concerns for Recording Magazine readers. I know that this is also a big issue for those of you in the voiceover world. Like I did last month, I asked permission to reprint this newsletter (and will ask to reprint the others in the series as well) so that those of you with home studios can also benefit from the information. I want to personally thank Brent Heintz, VP/Associate Publisher for granting permission, allowing me to share this great information with you.

Please visit Recording Magazine‘s website and Facebook Page.

Catch up or skip ahead: Part 1, Part 2, Part 4, Part 5, Part 6, Part 7, Part 8.

Here is the third newsletter in the series on Room Acoustics:

Welcome to Sound Advice on Acoustics! Last time we introduced the idea of standing waves and modes in a room, and introduced a simple formula for calculating them. In this month’s installment, we’ll run the numbers for a few sample rooms and learn what sorts of relationships between room dimensions are best, and which ones will get you into trouble.To determine what specific modal frequencies will be present in a rectangular room, we can use the simple formula given last time (1130÷2L, where L is the dimension of the room you’re checking) for each room dimension (length, width, height) to find the primary axial modes and their first few harmonics, and list them in a chart—we’ll do that for three rooms.We’ll be looking for two main things: (1) to find and avoid coincidences and near-coincidences (where the same modal frequency develops between two or all three pairs of parallel surfaces), and (2) to achieve relatively even spacing and avoid wide gaps between the frequencies of the modes that are present.Number one is fairly obvious—if the same modal frequency occurs for, say, both height and width, then the imbalances at that frequency will be twice as bad. This will occur if two (or more) room dimensions are the same, or are multiples of each other (the worst-case scenario would be a cube, L=W=H)—one of the examples will illustrate this.Number two is based on two assumptions. First, if a lot of closely- and evenly- spaced modes are present in a room, the overall effect will be more of a general reinforcement of the low frequency range. Second, if a few widely-spaced modes are present, musical notes whose fundamentals and harmonics coincide with these modal frequencies will be altered in timbre and noticeably boosted or attenuated in level relative to other notes.In a bad room, this can be very obvious—imagine a scale played evenly on the bass, with some notes almost dropping out and others booming excessively, depending on the listening position.

There’s no absolute consensus as to what the best distribution of modal frequencies might be. Even spacing is preferable, and it’s been suggested that modal frequency spacing of greater than ~20 Hz will result in audible unevenness, to be avoided or minimized to whatever degree possible.

With this in mind, let’s look at a few simple examples of room mode charts (feel free to analyze your own room this way as well).

We’ll look at the axial modes for three different rooms, first listing the first four axials under the room dimensions, then listing the first twelve axials for each room in ascending order. We’ll arrange the dimensions from greatest (L) to smallest (H) because this makes it easy to spot the numerical relationships.

Room Acoustics Figure 1

As you can see in Figure 4, Room A is not at all ideal: there are wide gaps between modal frequencies, and there are coincidences. Since the 16′ long wall is twice the dimension of the 8′ ceiling, the 2nd (harmonic) mode of the length (70.6 Hz) coincides with the 1st mode between floor and ceiling, also at 70.6 Hz. Since 8, 12, and 16 are all multiples of 4, at around 141 Hz a three-way coincidence occurs, which will be sure to make the imbalance of any notes/harmonics at that frequency really stand out!Room B is somewhat better: there are still some uneven, wide spacings, but there is only one coincidence, at around 141 Hz, and it only involves two modes rather than all three.Room C is even better—the spacings are more even, and there are no exact coincidences.This last set of room dimensions, 15’5″ L x 12’10” W x 10′ H, was based on one of a group of recommended “Golden Mean” room ratios; these ratios have been analyzed to provide the most even modal distribution (of course, in addition to the Axial modes they also take into account Tangential and Oblique modes).Here are a few of these Golden Mean room ratios, from various sources. In theory, it doesn’t matter which number applies to which dimension of the actual room, but building practicalities will mean that the shortest is usually the height; since many control rooms are wider than deep, the other two dimensions could interchangeably be width or length, but for consistency’s sake, let’s list the middle dimension as the width and the greatest dimension as the length of the room.

Golden Ratios, Room Acoustics Figure 2
For a quick idea of how this translates into the real world, assume a room with a 10′ ceiling, and apply the ratios; the formula at the top of the list, for example, yields a room of 10′ x 11’5″ x 13′ 11″ (H x W x L).

We’ll talk more about these Golden Ratios, and what you can do about room modes in terms of practical room treatment, next time. See you then!

Filed Under: Audio Production, Studio & Gear

Your Backup Plan For Your Home Studio

July 27, 2011 by Dan Friedman

home studio, backup planThe phone company is seriously crippling us today. ProComm Voices offers 15 ISDN connections, 13 of which are exclusively toll-free. This allows other studios and voice over talent to connect with us free of charge. But today, through no fault of our own, all toll-free lines are down. Needless to say… this is not helpful. Thankfully, we have a backup plan.
Anytime there are problems that are beyond your (or in this case… our) control, the first rule in dealing with these problems is clearly stated in “The Hitchiker’s Guide to the Galaxy”… “DON’T PANIC”.

Even though many of our local talent connect to us via ISDN, we’ll have them come in to our studios today. It will be nice to see them. Anyone who was scheduled to do a live audition with one of our producers will have to record those on their own at home. While it is always helpful to have a second set of ears on auditions, the voice talent will have to trust their own ears today (or even better, have another colleague listen). We’ll notify our clients via email that it will be necessary to contact us on our local lines and that our producers will call them at session time instead of them calling us. Because this is an emergency situation, we’ll use Source Connect today with our VO talent who also have it. We still have ISDN connectivity over local lines. Therefore, we will still be able to connect with our talent and if necessary stagger our schedules to accommodate sessions.

What do you do when something goes wrong that can’t easily and quickly be fixed?

If you are a voiceover talent, working from your home studio, you know that there are many advantages. However, when something goes wrong, you may not have the resources to work around the problem. Do you have a backup plan? Consider these scenarios:

– Its fifteen minutes before session time and the script has not arrived yet. This is not necessarily unusual, but you wonder whether you should check on it. After a few minutes of wondering, you finally check your computer and discover that your internet is down. You aren’t getting your emails. You don’t have a fax machine. What do you do? What is your backup plan?

– You turn on your computer and your hard drive freezes up. Nothing happens. What is your backup plan?

– A thunderstorm blew through the area last night and knocked out all of the power in your neighborhood. You have a 9AM session with a brand new client. What do you do?

Being prepared for these and any of the multitude of issues that can occur is critical to your success when dealing with problems. Be sure you have backup plans in place, contact names readily available and even extra equipment on-hand. Speaking of “backups”, backup all of your files regularly and keep several copies of your backup drives.

What are you prepared for? What aren’t you prepared for? What are your backup plans?

Filed Under: Studio & Gear

Room Acoustics Series (Part 2)… Thanks Recording Magazine!

June 28, 2011 by Dan Friedman

Recording Magazine sends out a newsletter to its subscribers every few weeks. The newsletter is (coincidentally) titled “Sound Advice” and this month it features the second in a series about room acoustics. As you will read, room acoustics is one of the biggest concerns for Recording Magazine readers. I know that this is also a big issue for those of you in the voiceover world. Like I did last month, I asked permission to reprint the series (and will ask to reprint the others in the series as well) so that those of you with home studios can also benefit from the information. I want to personally thank Brent Heintz, VP/Associate Publisher for granting permission, allowing me to share this great information with you.

Please visit Recording Magazine‘s website and their Facebook Page.

Catch up or skip ahead: Part 1, Part 3, Part 4, Part 5, Part 6, Part 7, Part 8.

Here is the second newsletter in the series on Room Acoustics:

Welcome to Sound Advice on Acoustics! Last time we sketched out the basic properties of sound: amplitude, frequency, and wavelength. And we talked about how sound waves in air interact with one another to make certain frequencies louder and others softer at various places in the room. Armed with those basic terms and ideas, it’s time for us to look at some real-world problems…

Low-frequency energy that is unevenly distributed is one of the main problems. When you apply the wavelength formula you’ll see that the wavelengths of bass notes easily exceed the measurements of typical rooms. Example: 55 Hz (the open A string on a bass) works out as follows: 1130 ÷ 55 = 20.54 feet. Few control rooms are deeper than 20’6″. When long waves approach and exceed the dimensions of the room, they are forced to fold back onto themselves, and the resulting cancellations and reinforcements will be localized to specific areas in the room. This results in clearly audible artifacts that must be dealt with. Fortunately, these interferences can be calculated and mapped out in the room.

In analyzing a room, the first aspect to consider is its overall size, as this will determine the limit of low-frequency support. Frequencies whose wavelengths are longer than half the longest dimension in a room are said to be unsupported in that room.

Take a small room with dimensions of 1’L x 10’W x 8’H. The formula 1130 ÷ 2L (where 1130 = the speed of sound in feet/sec, and 2L = the longest room dimension multiplied by two) gives us the lowest supported frequency in that room: 1130 ÷ 24 = 47.08, about 47 Hz (for reference, the fundamental of the lowest note on a 4-string bass is about 42 Hz). Frequencies below this will be unsupported, which doesn’t mean that they can’t exist in that room, but that they will be weaker from lack of resonant support (reinforcement by room resonances).

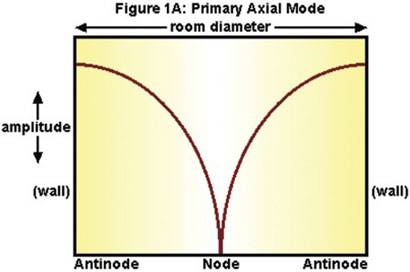
A special problem occurs with the frequency whose wavelength is exactly 1130 ÷ 2L; this will produce what’s called a standing wave or mode. This is a room resonance that occurs when a wave reflects between two parallel surfaces in the room. As the wave is contained by the room, a stationary distribution of reinforcements (boosts in level) and cancellations (null points) will be established as shown in Figure 1A.

Room Acoustics series, figure 1

The reinforcements (maximum pressure) of the standing wave occur at the walls (the points of reflection), while a cancellation occurs midway between the walls. This happens between every pair of parallel walls in the room (there are three pairs in a rectangular room, front/rear walls, side walls, and floor/ceiling).

The locations in the room where the sound wave is canceled are called nodes (in this example the midway point); the areas of maximum reinforcement are called antinodes (in this example at the walls). If you generated a sine wave test tone at that frequency, stood at one wall, and slowly walked to the other wall, you would hear that tone drop in level as you passed the midway point and increase in level again as you approached the opposite wall.

So far we’ve established the first modal frequency in that room, and obviously there are at least three, one for each pair of parallel surfaces. That’s only the beginning—for each room dimension, there are additional modal frequencies.

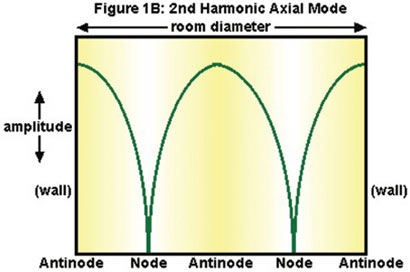
The second harmonic of this first mode will be twice that frequency and therefore half the wavelength—a sound wave of this frequency will also form a standing wave with discrete node and antinode areas. Since the wavelength of the second harmonic is half that of the fundamental’s, the peaks and nulls will be more closely spaced (by half), as illustrated in Figure 1B.

Room Acoustics series, figure 2

Once again (as always), the standing wave’s reinforcements occur at the walls, but now another reinforcement (Antinode) occurs halfway between, with cancellations (Nodes) a quarter of the way out from each wall. Again, remember this happens for each of the three parallel surfaces in the room.

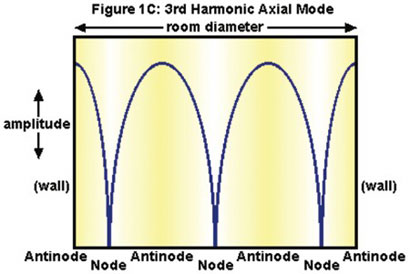
The same effect happens at the third harmonic (3 x the frequency, 1/3 the wavelength) of that initial modal frequency, (Figure 1C), and so on up, with more closely spaced nodes and antinodes. Eventually the wavelengths will become short enough that the reduced strength, greater density, and closer spacing of the various nodes and antinodes will tend to average out rather than be audible at specific spots in the room; this will happen gradually, beginning at around 300–400 Hz.

Room Acoustics series, figure 3

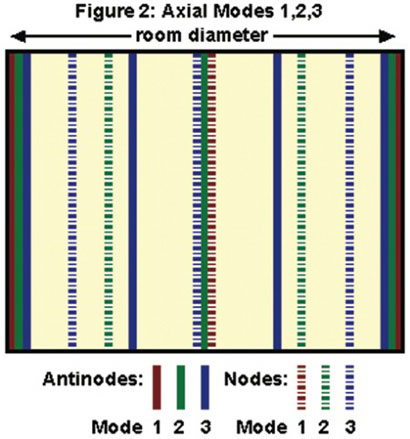
Figure 2 shows a plot of where the nodes and antinodes of the first three of these modes occur in the room. If you plotted each of the three pairs of parallel surfaces and overlaid them, you’d see the specific layout and intersections of the various nodes and antinodes. The particular frequencies affected would of course depend on the room dimensions.

Room Acoustic series, figure 4

And that’s not all—the modes described so far are only one of three types that exist in any rectangular room. These modes, which occur between two parallel surfaces, are called axial modes. They are by far the strongest and most problematic, but they’re not alone. Standing waves also result when sound waves bounce around four surfaces (see Figure 3)—these are called tangential modes; they have half the energy of the axial modes. Finally, oblique modes arise from sound waves that bounce around all six surfaces; these have one-quarter the energy of the axial modes.

There will always be a buildup of bass at each wall, and in the corners, where the different modes intersect, generating even more low-frequency energy; the three-way intersection of two walls and ceiling or floor will have the greatest amount of low-end buildup.

To fully analyze the low-frequency behavior in a room, all of these modes would have to be calculated and mapped out, but this is difficult to do without test equipment, and since the axial modes are by far the most prominent, we’ll focus on those to create some representative charts of modal behavior in typical rooms. We’ll do that next time… see you then!

Filed Under: Audio Production, Studio & Gear

Your Room and You

May 9, 2011 by Dan Friedman

studio, home studioWhile there are many elements to producing great voiceovers, few are as important as the room you produce them in. While it is important to carefully evaluate the sound of your room when it is completed, there are some basic things to consider in the beginning that will help ensure your space will sound great in the end. Here are some quick tips on choosing and creating your VO space.

Location
The space you choose should be a quiet place. Basements can be a good choice because they are often underground. Upper levels can also be a good choice because they are free from noise overhead. Spaces in your home farthest away from roads or other sources of outside noise are ideal. Begin by picking the right location based on what is available to you, and you will be off to a good start.

Size

You need a space that is comfortable and capable of containing you and your equipment. At a minimum you need room for yourself, a microphone, microphone stand and a copy stand and/or computer monitor. You may also wish to have a chair and some of your equipment in the space with you (the quiet pieces only please).

Dimensions

It is important to consider the dimensions of your room. Because of the way sound travels, square rooms are bad. Ideally the dimensions will be different or not evenly divisible by one another.

Sound Proofing

In a home studio setup, it can be difficult to completely keep outside sounds from entering your recording space. This is why choosing the best location is critical. If you are building your space, you’ll want to isolate it as much as possible by separating it from the rest of your structure. Using double thick walls, creating air-gaps between walls and floating the floor are commonly used methods. Think of it as building a room within a room.  If you are simply creating a space or using a prefabricated “voice booth”, keep it away from noisy household equipment and keep all of your noisy studio gear (anything with a running fan) outside of the room and away from the voicing area.

Acoustic Treatment

Treating the acoustics within your space is the final step. There are many products on the market that can help you with this or you can create your own. Acoustic foam panels of various sizes, thicknesses and shapes are just one of several options (panels made from mineral wool fiber covered in burlap are my personal choice.) Whether you are using pre-cut foam, buying other acoustic control materials or creating your own acoustic panels, the thickness of the panels determines what frequencies they work best to control. To tame bass or low frequencies you need thick panels, usually no less than 6 inches thick. For mid range and higher frequencies 2 and 3 inch thick panels will usually do the job. Absorbent materials and varied surfaces (such as pyramid or triangle shapes on foam) help to reduce reflections that cause a room to sound reverberant.

Location, size, dimensions, soundproofing and acoustic treatment are the fundamental considerations. This article is meant to get you thinking about these elements as you work on your voiceover recording space. For more in-depth information about room acoustics and sound treatment I recommend the following links:
Acoustics101.com
GIKAcoustics.com
RealTraps.com

For more information about sound and how it relates to your voiceover career check out: Sound Advice – Voiceover From An Audio Engineer’s Perspective.

It is important to understand that effective sound control requires that you utilize space and use materials that have mass. While there are several products available that wrap around your microphone or even you and your microphone, none of these are as effective as treating the room you are in properly. If you are serious about your career in voiceover you will get serious about your room. Other than your voice, nothing is more important to your sound than your recording environment.

Filed Under: Studio & Gear Tagged With: 4VO, acoustics, Dan Friedman, home studio, Recording, sound4vo, VO, voiceover, voiceover book

Win a copy of SOUND ADVICE!

March 15, 2011 by Dan Friedman

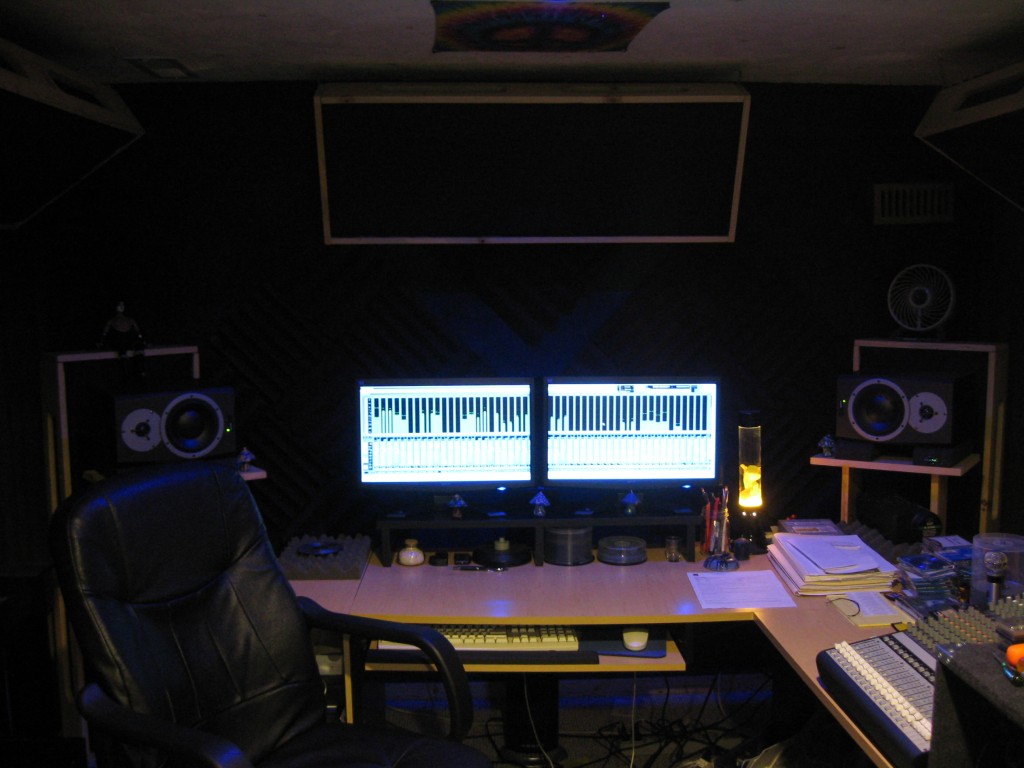
I’ll show you my home studio.

home studio, Sound4VO studio, Studio4VO, win a copy of Sound Advice

Now… you show me yours! Where do you voice from? Upload a photo to Facebook and tag soundadvice-voiceover, #soundadvice or my Facebook profile.

You can also find my Sound4VO Facebook page or read more about the book.

Share this post with your friends and encourage them to post their studio pics as well. Everyone who shares a tagged photo will be entered to win a copy of Sound Advice – Voiceover From an Audio Engineer’s Perspective. The winner will be randomly chosen on Monday April 4th. Don’t forget to “like” the page while you are there. Only one entry per person will be counted, but please share as many times and with as many friends as you like. It doesn’t matter whether you voice from a closet or from Abbey Road, we want to see it. So c’mon everyone… show us your studio!

Disclaimer: No purchase necessary. Not all who enter will win. Winner will be announced and contacted via facebook. Be sure to have valid contact info available. Autograph on winner’s copy available upon request (please no selling for large profit on ebay). Winner to be chosen from a drawing out of my sons baseball cap.

Filed Under: Sound4VO News, Studio & Gear

  • « Go to Previous Page
  • Page 1
  • Page 2
  • Page 3
  • Page 4
  • Page 5
  • Go to Next Page »

Primary Sidebar

Search Blog

Categories

Want to see how well we work together first? LET’S DO IT!!

Book a Single Session
Book a FREE Meet & Greet

Follow Sound4VO

Dan Friedman Voice Over Coach & Demo Producer Tiktok

Tip Jar

Have questions on anything related to voiceover? Dan is available for email consultations at no charge. Ask away! If he's able to help you with your problem, tips are greatly appreciated... Use the "tip jar" below to show Dan the love!

Dan Friedman Voice Over Coach & Demo Producer Tiktok

[email protected]

828.551.0891

Dan Friedman Voice Over Coach & Demo Producer Zen and the art of Voiceover Audiobook Cover Img
Buy Now
Dan Friedman Voice Over Coach & Demo Producer Sound Advice Cover Img
Buy Now

RLM CERTIFIED MASTER COACH Since 2021

Dan Friedman Voice Over Coach & Demo Producer RLMC Logo

©2025 Dan Friedman Sound4VO // Voice Over Site by Voice Actor Websites

MENU
  • Home
  • About
  • Demos
  • Coaching4VO
  • Books
  • Services
  • Testimonials
  • Sound4VO Blog
  • Merch
  • Contact