Dan Friedman
Voice Over Coach & Demo Producer
828.551.0891
[email protected]
  • Home
  • About
  • Demos
  • Coaching4VO
  • Books
  • Services
  • Testimonials
  • Sound4VO Blog
  • Merch
  • Contact

sound4vo

Choosing a Voiceover Microphone

May 1, 2013 by Dan Friedman

By Dan Friedman Choosing a Voiceover Microphone.

As a voiceover artist, it is critical that you choose the right microphone for your voice, your room and your budget. When it comes to determining which microphone is right for you, there is only one good way to go about making this very important decision.

Before buying anything, YOU MUST LISTEN AND COMPARE FOR YOURSELF.

Typically, when voice talent begin their career or begin to invest in a home studio they choose a microphone based on one or more of the following: advice from friends or associates, familiarity with something they’ve used previously (perhaps an Electro-Voice RE20 from a radio station), what the sales person at the music store sells to them, or what they can afford. Although all of these factors should be taken into consideration, they serve as merely a starting point.

The advice of others is helpful, but how good something sounds to one person (or on one person’s voice) may not be as good for someone else. The best way to use the advice of others is to list all of the microphones they mention as possible options. For those who have had experience in broadcast, it is important to note that although those RE20’s and Shure SM7’s are great in radio stations for their sound and their durability, they are not necessarily the best choice for voice overs.

Of course the advice of a salesperson should always be “taken with a grain of salt”. They may be very knowledgeable, but they may also be getting incentives to sell you something that just isn’t right for your needs or your voice. Lastly, it is understandable that everyone wants to save money, but consider two things:

  1. Since this is your career, you want to sound your absolute best, and sounding your best should help you pay for your investment.
  2. If you do the research, you can still find the best microphone for you and your current situation.

The best advice will most likely come from the engineers you work most closely with. Engineers in the voice over industry often have the benefit of hearing many different microphones on many different voices. Not only do they know what they like, but they may also know your voice and the sound of your room well enough to know which microphones will work best for you.  Also, if you are working with them closely already it may mean that you are already earning money with them and that is the best reason to seek their advice and make a decision that will help keep them happy with your sound. But even with all of that being said…

Nothing can replace the experience of actually testing several microphones and listening to the myriad of choices and sounds that different microphones offer. It is truly an ear opening experience.

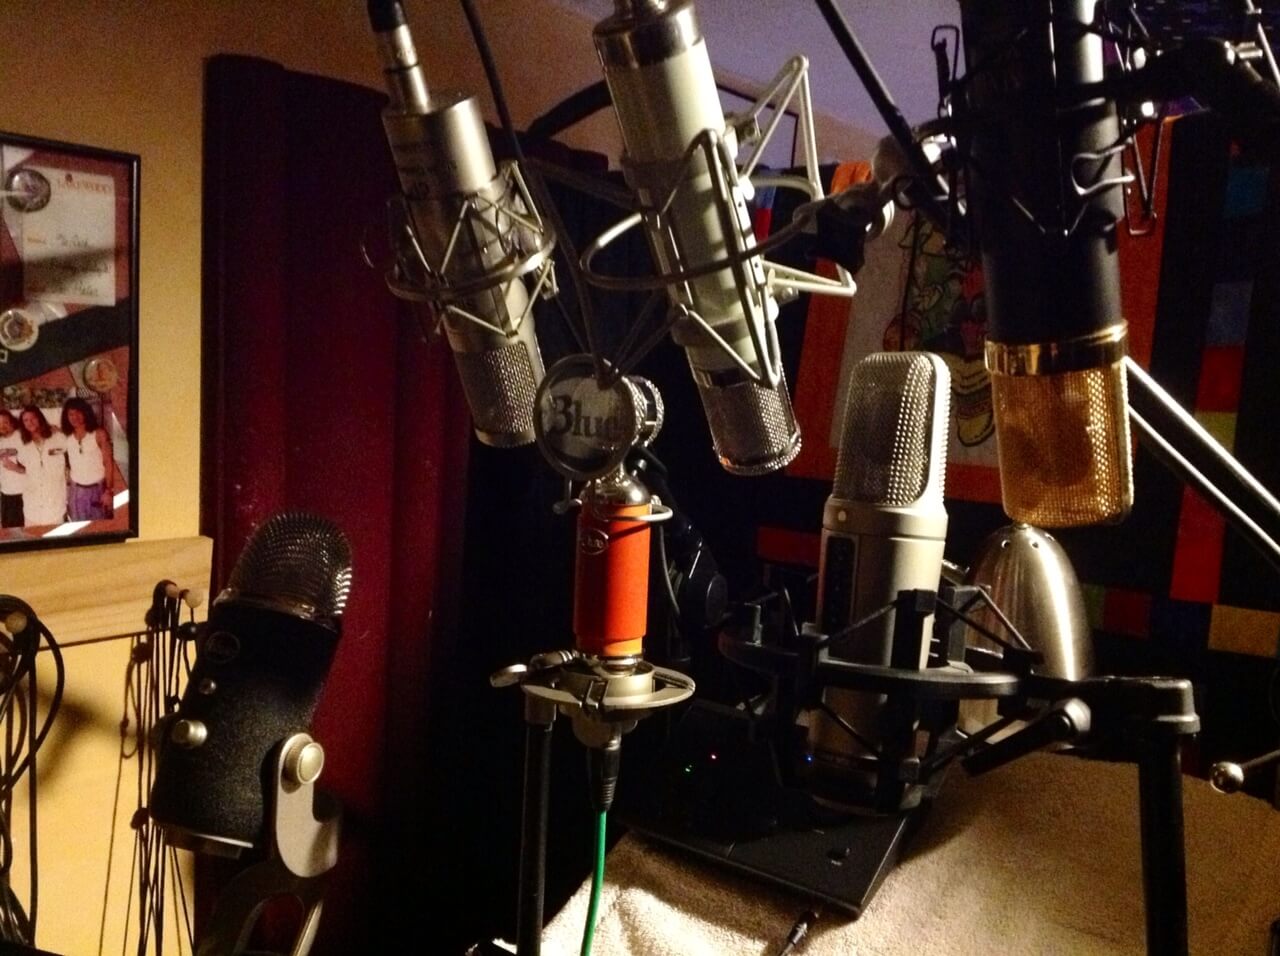
It should be noted that there are several microphones that are considered voice over industry standards and the only reasons to not choose one of them are: 1) if you absolutely can not afford them or 2) if they do not sound as good on your voice as something else. For voiceovers or voice acting, the Neumann U87, TLM 103 and Sennheiser 416 are industry standards because of their well known characteristics and sound quality. Therefore, engineers and producers generally prefer to work with these microphones.

If you either can not afford one of these microphones or they are just not working well for you, here is a plan that should help you find the best microphone for you and your situation. As a general rule, a large diaphragm condenser microphone will likely be the most appropriate choice as a voice over microphone. There is an enormous selection of LDC microphones available and they range in price from below $100 to up into the thousands of dollars.

Begin by making a list of microphones, and noting which ones fit your budget. Include at least one industry standard microphone (you will use this to compare others against). Start your list with all of the microphones that have been suggested to you. Read through descriptions of other microphones in music store catalogs, websites, industry blogs and forums. If you are serious about your career, you will not limit yourself to just the cheap ones. Remember, the idea is to find the best microphone for you and although you may not be able to afford “the best one” now, you will at least know what that is and may be able to get it later. Make no mistake, among inexpensive microphones there are some great values available and one may even be perfect for you.

If you are reading the specifications for microphones (and you should be) look for words and phrases such as: high signal to noise ratio or low noise, capable of withstanding high sound pressure levels or SPL, wide dynamic range, sonic clarity and transparent signal.

Note whether a particular model is generally used for vocals or instruments. Also pay attention to what accessories may be included in the price.

I strongly suggest using a shockmount. A shockmount is a “basket” that holds a microphone. It is designed to help eliminate vibrations that can reach the microphone through the microphone stand. Some microphones include a shockmount, for others it must be purchased separately.

After you’ve done your research, have made a list of microphones that interest you and that fit your budget, it is time to visit a music store with a pro audio department. Even if the nearest one is far away, it would be worth making the trip. This is your sound and your career we are talking about!

Bring along at least 3 scripts. Bring a high energy script that requires you to push your voice a bit, bring a script that matches the style you perform the most and bring a script that requires a close and intimate read. You may also consider including a script that contains several hard consonants such as “t” or “p”. When you get to the store let a salesperson know that you would like to test and compare some microphones. You will need to be setup with a mixer, a microphone cable and some headphones. Of course if you already have headphones that you are familiar with you should bring your own. If you can find a quiet area within the store, it would be best if you can use that space for your tests.

Ask for one of the industry standard microphones – you will want to keep this around to refer back to as you try others. Using the same exact audio chain and settings begin testing your reads through each of the microphones on your list (remember to turn the phantom power off and back on as needed when switching microphones). For this test you will want to have your headphones reasonably loud, but not so loud that they damage your ears. The idea is to listen closely to the nuances in the microphone. Do not worry about your read.

Use your ears and ask yourself the following questions as you listen. Listen to the high end. Is it crisp and clean or is it smeared?  A “smeared” high end has the sound of being distorted, where “s” seems harsh, brittle and possibly almost painful.  It sounds as though there is just too much of it and the sound doesn’t end cleanly. Is there not enough in the high end? Does your “s” seem to disappear or sound dull? Listen to the midrange. Is your voice coming through clearly as you know it, or does it sound affected? Does it sound a bit like it is coming through a telephone or a megaphone? Is the midrange seemingly harsh or is it seemingly dull or distant. Ideally, it should sound…the way you really sound. Listen to the low end. Particularly if you are a deep baritone, pay attention to how the deepest part of your voice is translating. The low end can be distorted in much the same way “s” can be distorted in the highs, except the lows will sound too thick or “muddy”.

How are the “t” and “p” consonants coming out? Is the microphone popping easily on these consonants? How does the microphone react when you change your proximity to it? Listen closely for all of the details and ask yourself each of those questions. Compare your favorites to each other and to the standards (remember that it is perfectly fine if one of the standards is your favorite). Ask a friend or someone in the store for their thoughts on the sound. Choose the one that sounds best. If you can’t decide which one sounds best, go with the one that sounds the most similar to one of the industry standards.

Once you make your choice, bring it home and try it out in your own studio. Be sure that it still sounds as good to you at home as it did in the store. Remember that your microphone captures the sound of your environment as well as your voice and it may become evident that some changes to your room are necessary… but that is for another article.

Whether you are just starting out or are a seasoned voice over professional this process should be fun as well as informative. Best of all, after you’ve gone through the process and made your decision you will have confidence knowing that you made the best choice for you, your voice and your budget.

Filed Under: Studio & Gear Tagged With: 4VO, microphone, Sound Advice Voiceover From an Audio Engineer's Perspective, sound4vo, VO, Voicebank, voiceover

FaffCamp Is Just Around The Corner!

April 30, 2013 by Dan Friedman

faffcamp-patch-logo-faffcon_225x200From the creators of FaffCon… coming this May to the Omni Hotel in Charlotte. An event like no other in the voiceover industry… FAFFCAMP! Three days of what will prove to be the most educational experience available to both new and experienced voice actors and industry professionals.

You won’t have to look very far to find people who say that FaffCon has changed their life. In fact, look to some of my past blog posts and you’ll see that I have nothing but love for the event and everyone involved. I have no doubt that FaffCamp will prove to be as educational, fun and life changing as FaffCon has been. But, what is the difference between the two?

Those who have experienced FaffCon know that when you arrive for the opening circle presentation, there is an empty grid posted upon on a wall as you enter the room. That grid is then filled with session topics by the participants on the first night. With FaffCamp, that grid has been completed for you. No more tape and index cards. Session topics have already been planned, organized and scheduled. This preplanned format is essential for FaffCamp. It ensures that voice actors at all levels can gain maximum benefit from the event and not miss a single opportunity to learn or share their own experiences.

Another new feature is the Expo stage. For those familiar with the breakout sessions at FaffCon, where specific topics (as decided by the attendees) are discussed. The Expo will provide that same experience. However, and here is the best part, you won’t have to sacrifice one experience for another or be forced to choose between two equally appealing sessions. The expo will make every experience available to you, and within whatever time frame works best for you.

Each expo speaker will have a time slot on the expo stage, but they will also be available throughout the weekend to offer their time and expertise from the expo area.

Have you been looking for information on getting ongoing voiceover training? Joey Schaljo will be available to discuss opportunities with Edge Studios. Do you want to treat your recording space for better acoustics? Details about Dan Lenard’s Studio Suit will be available. Maybe you need a better way to get your demos up on your website? Voicezam to the rescue!

Speaking of demos, Cliff Zellman will have some exciting news about a great new way to create the best voiceover demo you’ve ever had. Representatives from the new organization WoVo (World Voices) will be there. I will also be there to offer assistance in all things voiceover, from studio to performance. Need a copy of “Sound Advice – Voiceover From an Audio Engineer’s Perspective”? I’ll have them. I will also be there representing Voicebank. Their Weekend Workout and Premium programs are great ways to get heard… by some very important people.

Also at the expo, audio editor Eric Souer, Rob Sciglimpaglia’s book “Voiceover Legal” and John Florian from the voiceover industry’s most popular website, Voice-OverXtra. Need a very cool timer for your studio? Of course you do! Bowman Technologies has large screen timers that are perfect for ensuring your deliveries make it in :30 or :60. Bowman Technologies will be at the expo!

There are a number of other new and exciting things planned for FaffCamp, and I don’t want to give it all away here, so you’ll have to be there to experience it all.

FaffCamp is just around the corner and it is an event you will not want to miss. Join us on May 3rd, 4th and 5th in Charlotte and discover why FaffCamp is the one event that is unlike any other in the voiceover industry.

Filed Under: Sound4VO News, Sound4VO Posts Tagged With: Bowman Technologies, Cliff Zellman, Edge Studios, FaffCamp, Faffcon, Sound Advice Voiceover From an Audio Engineer's Perspective, sound4vo, VO, Voicebank, voiceover, Voiceover Legal, voiceover talent, VoiceOverXtra, WorldVoices

The Anatomy of Three Voiceover Home Studios Part 3

April 4, 2013 by Dan Friedman

SOUND4VOStudio It is as simple as this… if you want to work in voiceover, you need a home studio. I know it seems hard to believe, but it is true; the days of being chauffeured around from studio to studio where you talk for a few minutes and line your pockets with cash are long gone… and have been for years. More recently, the need for racks filled with expensive magic audio boxes has also become unnecessary. Today, with nothing more than a USB microphone and an iPad, you can be recording high quality audio in no time. Well… sort of.

In this final installment, of the three part series(part 1) (part 2), I’ll discuss a third type of voiceover recording setup. In this setup… the sky is the limit! Keep in mind, that in any recording setup, there are at least two common denominators that will remain constant. They are, and always will be, the two most important factors in your sound and your success… you and the space in which you record. The cheapest setup can sound great (or at the very least… useable) with an amazing talent, performing in a great sounding space. A great performance on expensive equipment can be useless in a noisy or terrible sounding space.

With that in mind, let’s checkout setup number three.

Voiceover Recording Setup 3

While setup 1 and setup 2 are portable, portability was never the goal. Consistency from one session to the next is a critical element to success in voiceover. Therefore, remaining in one space is preferred. Recording setup 3 is stationary, and there are other big changes that will have you prepared for anything. One of the biggest changes is incorporating a mixer into the setup, which will allow you to include phone patch and (when you are ready and if the technology is available where you are geographically) an ISDN codec.

I could very easily have added them to the other two setups but with setup 3, the other big change is the necessity for studio monitors (speakers). Nobody should be listening critically to audio on headphones alone. Headphones, by design, do not give you a true picture of how we hear sound in the real world. We hear with both of our ears in combination, not with the left and right sides in isolation. Studio monitors are a personal preference. Whichever monitors you choose, you should give yourself some time to get familiar with their characteristics. More importantly, they should be comfortable for you to listen on over long periods of time.

Most components listed in setup 2 will remain the same for this setup. Instead of a laptop, a desktop computer will serve as the focal point for this studio. This will likely increase your storage capacity and speed. It will also give you more visual real estate due to a bigger computer monitor (the screen) and you can get even more real estate by adding an additional monitor.

With this setup, the sky is the limit when it comes to options, components and prices. Upgrades are possible in all areas of your audio chain. While the $300 microphone may still be perfect for you, it may be worthwhile to explore more expensive options. The same is true for your preamp, interface, cables and… well… everything. The price ranges I’ve listed below, now reflect the cost of higher priced equipment that can be found in many home voiceover studios.

Overall estimated cost:

High quality desktop computer w/OS and basic software – $1500 – $3000
DAW – $0 – $1800 (Audacity and “lite” DAW software = $0, full versions = $1800)
Separate Preamp – $500 – $2500
USB/Firewire Preamp or standalone AD/DA Converter – $150 – $2500
Mixer – $100 – $1000
Standard (XLR) LDC microphone – $300 – $1200
ISDN Codec or Source Connect Pro Software – $1000 – $3000
Phone patch – $175 – $500
Headphones – $100
Studio Monitors – $300 – $1600
Cables/adaptors – $50 – $200
Heavy duty microphone stand w/boom – $150

Setup 3 cost = aprox. $4325 – $17,550

Your home studio. For just over $1000, which was discussed in part one of this series, all the way up to over $17,000 (and beyond) you can be recording, editing and producing voiceovers. Note that these costs don’t take into consideration acoustic treatment or sound proofing (the prices for Whisper Rooms, for example, begin at just over $3000). Furthermore, if you’re interested in doing full production and mixing, you’ll need music, sound effects and audio processing plugins to go along with your DAW software.

Some of the items listed can be combined and many of the items are transferable from setup to setup, allowing your studio to build upon itself and grow with your career. Also, it is more likely that setup 1 could be the last setup you buy rather than your first. The portable studio is far more useful to voice talent who’ve been working at this awhile and are in higher demand.

So, now that you’ve gotten your studio budget figured out… start working on your budget for coaching, marketing materials, website, travel to industry events and your very own… chauffeured limousine. 😉

Filed Under: Studio & Gear Tagged With: Dan Friedman, home studio, sound4vo, voiceover, voiceover book, voiceover recording

The Anatomy of Three Voiceover Home Studios – Part 2

March 8, 2013 by Dan Friedman

It is as simple as this… if you want to work in voiceover, you need a home studio. I know it seems hard to believe, but it is true; the days of being chauffeured around from studio to studio where you talk for a few minutes and line your pockets with cash are long gone… and have been for years. More recently, the need for racks filled with expensive magic audio boxes has also become unnecessary. Today, with nothing more than a USB microphone and an iPad, you can be recording high quality audio in no time.

Well… sort of.

In this installment, of what will be a three part series, I’ll discuss the second of three types of voiceover recording setups. Each setup will cover reasonable price ranges that will, at a minimum, be capable of providing an acceptable level of quality as well as varying degrees of flexibility. A professional working voice talent could easily own all three of these setups at different points in their career, or even use any one of the three interchangeably with the other two. With proper planning, the smallest, most portable and least expensive setup can easily grow with and become an integral part of the most comprehensive and expensive setup.

While these setups are different, there are at least two common denominators that will remain constant. They are, and always will be, the two most important factors in your sound and your success… you and the space in which you record. The cheapest setup can sound great (or at the very least… useable) with an amazing talent, performing in a great sounding space. A great performance on expensive equipment can be useless in a noisy or terrible sounding space. Keep that in mind as we explore the following VO setup.

Voiceover Recording Setup 2

For recording setup two, rather than going with a tablet (which was discussed in The Anatomy of Three Voiceover Home Studios Part 1), choose a high quality laptop computer.

Personally, I believe that this setup is the one everyone needs at a minimum. The tablet based recording studio is very limited when it comes to choices and flexibility. Going with a laptop, rather than a tablet, opens up a world of possibilities. With a laptop computer you’ll get far better: storage capacity, ease of use, compatibility with hardware interfaces, including both USB and firewire, and access to most all of the DAW options (depending on which OS you choose). The flexibility alone is well worth the additional cost. The computer is the foundation of your studio. So, no matter what level you are at, spending the most money here is always well worth the added investment.

When using a full featured computer, the world of available interfaces increases dramatically. You can use USB interfaces or upgrade to the faster firewire or thunderbolt options. Most interfaces in this category offer preamps and phantom power, and many have multiple preamps. For this studio setup, I’ll assume that you’ll still want to keep it portable. Therefore most of your options will fall between $150 and $750.

Having at least two inputs on your preamp/interface allows you to add another key component to your studio… the phone patch. The phone patch allows you to pipe in a client/director to your headphones and receive direction live during a session. Most phone patch devices are designed to work with land lines but the JK Audio Daptor 2 works with cell phones. This is a bit more practical since many people are abandoning their land lines.

While recording, even on a powerful laptop, it is good practice to close other applications on your computer and use only those that are most critical to getting the job done such as your DAW, interface control panel, etc. Its not recommended that you surf the internet, talk on Skype and manipulate Excel spreadsheets while simultaneously recording audio (like you would want to work on a spreadsheet… HA!). Attempting to multitask in this way is not only difficult for you, but can make it possible for erroneous sounds, possible anomalies and errors to sneak into your recordings. For this reason, it is still very useful to add a tablet into your studio setup.

With a tablet, there are many useful apps that you can easily incorporate into your workflow including apps for reading and editing scripts (no more paper), timers/stopwatches and communications apps such as Skype. Perform these peripheral tasks on your tablet while recording and editing on your laptop.

Besides being far more flexible and overall easier to use, there is also at least one area for cost saving that is available by choosing a laptop. While a comprehensive and full featured DAW is recommended, Audacity software is FREE and available for both Mac and PC. Compared to most DAW’s, Audacity is a bit “clunky” in its operation. But, it is capable of doing most recording, editing and even processing tasks that are important to a voice talent. Another consideration is that many hardware interfaces come packaged with DAW “lite” versions. Not only are they capable of performing critical recording and editing tasks, they are also a great introduction to the full versions of the software.

Itemized estimated costs:

High quality laptop w/OS and basic software – $1200
DAW – $0 – $500 (Audacity and “lite” DAW software = $0, full versions = $500)
USB/Firewire PreAmp-AD/DA Converter – $150 – $750
Standard LDC microphone – $300
Phone patch – $175
Headphones – $100
Cables/adaptors – $50
Heavy duty microphone stand w/boom – $150

Setup 2 cost = aprox. $2125 – $3225

Add a tablet for an additional $550 (If you started with setup one and are adding components… you’ll already have a tablet).

In the final installment of this three part series, the sky is the limit! I hope you’ll check it out.

Filed Under: Studio & Gear Tagged With: Dan Friedman, home studio, sound4vo, voiceover, voiceover book, voiceover recording

Voiceover Training | Racks and Stacks or Priorities Out of Whack?

December 5, 2012 by Dan Friedman

People new to voiceover are always asking me about effects stacks. For those of you who don’t know what effects stacks (or effects processors) do, or for those who don’t know what I’m even talking about, you are in luck. This article will help explain a couple of the most commonly used effects processors and will also help you steer clear of some things you probably should avoid… for now.

Compression and Equalization… What they do.

Audio effects processors including compressors and EQ (or equalizers) are very important elements in audio production. Compression is used to control dynamics, or the loud and soft parts of a recording. A compressor controls dynamics by lowering the output level of louder parts and raising the level of softer parts. This produces overall output levels that are more evenly balanced throughout the compressed portion of audio.

An equalizer is used to adjust the tones, or frequencies, within a sound. EQ can be used in several ways to enhance or alter certain tones by increasing or decreasing the level of specific frequencies to create an overall sound that is more pleasant. EQ can also be used to create an effected sound, such as simulating the sound of a telephone.

This is all very cool! However, if you are just getting started in voiceover, (and most of the time, even if you’ve been doing this for awhile) these effects are not really something you need to be overly concerned with… at least, not in the beginning.

What should you do?

Should you attempt to learn a little something about them as you are learning your craft? Yes.

Should you be running all of your voice recordings through rack or outboard processors as you are recording? Definitely not.

Should you be inserting DAW effects, effects stacks or presets on every voiceover recording you produce? No.

As you are working on developing your voiceover career, your number one focus should always be on your delivery.

The Magic is in Your Delivery.

When used properly or creatively, processing can make a good recording sound great. But a weak performance, will always sound like a weak performance no matter how much or how little processing is used. It is very easy for people to get caught up in the magic and mystery of the tools, rather than focusing on where the magic truly lies… in the delivery. Simply stated, compression and EQ will not turn a weak delivery into a magical one.

Speaking of deliveries, different scripts require different interpretations, enthusiasm, loudness and energy levels. How loud or soft certain elements are in your delivery are not the same for every script. Therefore, you cannot simply go to the same presets for every script you read and “set it and forget it”. One size, does not fit all.

Creativity or Correction? What Would Be More Fun For You?

Also, as a new voice talent, it is rare that you will be called upon to do a full production. Most often you will be sending your audio elsewhere, where it will be edited, manipulated and mixed alongside music, sound effects or other voices. The mix engineer cannot undo this type of processing. If you were to add processing incorrectly or inappropriately, you may have created a very frustrating situation that could make a mix engineer very unhappy. A new unprocessed recording could be the only solution to the problem and there are no guarantees that the client will come back to you to get it.

Generally, compression and equalization are used in two ways; creatively or correctively. If you’ve chosen your equipment well, have a finely tuned acoustic environment and are always working on your technique, these processing tools can be used creatively as opposed to correctively. Rather than using these processors in an attempt to fix difficult acoustic or technical problems, the tools can be used to place your voice properly in a mix or to enable you to sound like you… only better! As you can imagine, creative, is far more enjoyable for the mix engineer.

As you pursue your career as a voice talent, it will be helpful to learn and understand all elements involved in audio production. However, have patience and focus on what is important for you at this moment in time. Above all, remember that no matter what level you are at in your career, the most important effect to the voiceover talent… is the effect your delivery has on the listener.

You’ll find more on compression and equalization in Sound Advice – Voiceover From an Audio Engineer’s Perspective.

Filed Under: Audio Production Tagged With: Compression, Dan Friedman, EQ, Equalization, sound, sound advice, sound4vo, studio, voiceover, voiceover talent

Directing Voiceovers… Lend Me Your Words

October 3, 2012 by Dan Friedman

Click Here to Listen!

Effectively communicating with a voiceover talent during a recording session can be a struggle for clients, or for many new directors. Recently, a client suggested posting “a list of words that can be used to help explain the changes they would like the voice over person to modify.” This sounds like a great idea and an easy thing to do… right? Well, yes… and no. While a list may be helpful in some situations, it would only scratch the surface of what may be involved when directing a voice talent.

Contradiction

Much of the language used when directing seems contradictory. For example, “urgency” almost never means to read the script fast and “intensity” does not mean to shout or automatically give a script the monster truck rally treatment….

“SUNDAY! SUNDAY! SUNDAY! YOU’LL PAY FOR THE WHOLE SEAT… BUT YOU’LL ONLY USE THE EDGE!” 😎

While that delivery is intense… it would be inappropriate on an intense commercial for a hospital. Similarly, while “urgent care” in a hospital means to get care quickly, in a commercial for a hospital, “urgent” usually means to read somewhat slowly, with great concern and importance.

Another term that is used frequently is “cool”. Does this mean cool, as in hip or cool as in calm? Contradictory and/or ambiguous language is just one reason why a list of words or certain terminology will not help in every circumstance.

What’s My Motivation?

Because every talent responds differently to different methods of direction, what works for one talent… may not work for another. While some talent may respond well to simple words or verbal cues, others may need background information such as what the writer’s intention is or in what format will the final production be presented (radio/tv commercial, boardroom presentation, classroom presentation, etc.). Many voice talent like to know the environment in which a scene takes place… for example a coffee shop, city street corner, or bedroom. The same dialog can take place in any of these locations but each may require a different delivery. A voiceover talent may want to hear the music if it has been chosen, or be given specific guidance on inflections or even where to stop and take a breath. The possibilities and combinations of factors are seemingly endless.

Directing, like most things, is much easier after gaining experience. But, the best way to do any job… is by not having to work hard at it. Thankfully, there are a few ways to help you get the delivery you desire with minimal effort and without the need to do much directing. Like many other professions, using the right tools and having the right team can make the difference.

The Tools and the Team

The first best method for getting the delivery you want, is to have a well-written script. Good scripts provide road maps for the voice talent. Proper punctuation, grammar and formatting are helpful, but more importantly, the use of descriptive or illustrative words allow the talent to capture the mood and feel of the message. Unless you are seeking a delivery that is intentionally counterintuitive or completely unique (a character voice for example), the tone of the script should be obvious to the voice talent.

This brings us to the second best method, which is to choose the right talent for the job. Here is where things can get very tricky. A voice may sound great on a demo, but that doesn’t necessarily mean that the voice talent is the right choice for your script. Time and time again… big announcer voices are hired for their vocal quality, but are asked to sound conversational. This usually requires additional time and effort for the delivery to sound believable (as though a “real person” is presenting the information).

Some voice talent are more suited to announcer reads, others are great at sounding conversational and others are good at narrating or story-telling. Some talent can interpret copy flawlessly, while others need extensive direction, instruction and line reads in order to achieve the delivery you are seeking. Some talent can interpret copy very well while acting as a character, but have great difficulty when delivering the same material as themselves. The trouble is, as the client acting as director, you often don’t know what your chosen talent’s strengths and weaknesses are… until after you’ve hired him or her.

With a well-written script, it should rarely take a voiceover talent more than four attempts to get the tone of the delivery correct. The first take should be left to the talent’s interpretation of the script. A good voice talent will usually get reasonably close on the first pass. The second take is used for dialing up or dialing down the energy or for any clarifications on tone or characterization. The third take is for fine-tuning any changes made in take two. By take four, the over all tone will ideally be dialed-in.

No Substitute For Experience… or Great Ears.

Great voiceover talent don’t need much direction and a good script will provide most of the information a voice talent should need. But once the tone and delivery are where they need to be, tweaks and fine-tuning may still be necessary to help the talent provide the best performance possible. This is when experienced audio producers and engineers become an increasingly more valuable part of your team.

Professional audio engineers, who specialize in voiceover, often take on the role of director. They often work with many voice actors and have experience knowing not only what buttons to push on the equipment, but also which buttons to push within the talent that will produce the desired delivery. They may also be responsible for the assembling the final mix and will develop a “vision” for what will help the final production sound best. When you find an engineer who shares your vision, do not hesitate to allow him or her to interpret your needs and communicate them to the talent if you are having difficulty.

Lend Me Your Words

Clearly, there is a great deal involved in directing a voiceover session. While a list of words may not always be helpful or simple to create, there is no reason why we shouldn’t try. I’ve included a few words with their possible meanings in this article. I invite all of you (talent, directors, engineers, coaches… and everyone reading this blog) to add some of your own in the comments section and I’ll compile them for a future post. I look forward to seeing and hearing what you come up with.

Filed Under: Voiceover Tips & Advice Tagged With: 4VO, Dan Friedman, sound4vo, VO directing, voiceover, voiceover book

  • « Go to Previous Page
  • Page 1
  • Page 2
  • Page 3
  • Page 4
  • Page 5
  • Page 6
  • Page 7
  • Go to Next Page »

Primary Sidebar

Search Blog

Categories

Want to see how well we work together first? LET’S DO IT!!

Book a Single Session
Book a FREE Meet & Greet

Follow Sound4VO

Dan Friedman Voice Over Coach & Demo Producer Tiktok

Tip Jar

Have questions on anything related to voiceover? Dan is available for email consultations at no charge. Ask away! If he's able to help you with your problem, tips are greatly appreciated... Use the "tip jar" below to show Dan the love!

Dan Friedman Voice Over Coach & Demo Producer Tiktok

[email protected]

828.551.0891

Dan Friedman Voice Over Coach & Demo Producer Zen and the art of Voiceover Audiobook Cover Img
Buy Now
Dan Friedman Voice Over Coach & Demo Producer Sound Advice Cover Img
Buy Now

RLM CERTIFIED MASTER COACH Since 2021

Dan Friedman Voice Over Coach & Demo Producer RLMC Logo

©2025 Dan Friedman Sound4VO // Voice Over Site by Voice Actor Websites

MENU
  • Home
  • About
  • Demos
  • Coaching4VO
  • Books
  • Services
  • Testimonials
  • Sound4VO Blog
  • Merch
  • Contact