Dan Friedman
Voice Over Coach & Demo Producer
828.551.0891
[email protected]
  • Home
  • About
  • Demos
  • Coaching4VO
  • Books
  • Services
  • Testimonials
  • Sound4VO Blog
  • Merch
  • Contact

audio engineers

Voiceover – Tips and Tricks for Audio Production

May 3, 2016 by Dan Friedman

logo 4vo

By Dan Friedman with contributors Dan Gustafson and Cliff Zellman

Let’s talk … audio production. While it is easy for a voice actor to think only of their performance and delivery of the copy, it is also important to remember that all of those beautifully spoken words are pieces in a larger audio landscape. For those interested in producing and mixing, or for those VO talent interested in a glimpse into the world of sound design, this post is for you. I’ve offered up a few tips about audio production and asked a few friends to contribute as well.

Check it out and if you have any tips, feel free to leave a comment.

My longtime friend, producer Dan Gustafson of Sonicbliss Productions, (Have you ever noticed how many guys named “Dan” work in this business? Weird.) recently produced my radio imaging demos. He did such a stellar job that listening to my Active/Alt Rock Imaging Demo actually makes the hair on my arms standup. Here he offers some of his production and mixing tips.

Panning, Pitch Adjustments and EQ:

If I’m trying to create a snowball fight scene I’m going to need a lot of elements. Snowballs flying, snowballs hitting things, crowd noise, outdoor ambience, peoples reactions to getting hit with a snowball etc.
The way I would approach this is, for all the various snowball impacts I would use a pitch plugin and pitch them differently so they all sound individual. Then pan them all over the place. One could be panned left to 34, another could be panned right to 57, another could be panned left at 72, another could be panned right at 99 one could be right down the middle in mono. The stereo spectrum we have to play with is so huge, take advantage of it.
In terms of EQ, carve out a space for each item. If I have a track of crowd noise and a track of outdoor ambience on top of each other, I might do a cut at 1800k on one track and a boost at 1800k on the other track. The frequency range can be whatever sounds good to you, the boost one and cut the other is the important thing.

VO Performance:

The best VO talents can take the worst piece of copy in the universe and make it sound compelling. How? Silence, inflection, dynamics and changing pace/intensity.
I think silence is huge but you need to be lucky enough to have copy that gives you room to breathe for that to work.
In terms of inflection, after you’ve read it a few times the way you “think” it should be read, try reading it with totally different inflections, energies and emphasis. It could sound horrible, but, you may find a gem take in there or something that leads you down a different path. These are the things that would help a VO talent stand out in a crowd of thousands.
When it comes to dynamic range, maybe think about a great song. It isn’t all in one dynamic range, it has soft parts and loud parts to emphasize certain points. Spot copy should be treated the same way in my view.
And how exciting is a movie trailer or song when it starts out slow, begins to build in speed and intensity, then hits a crescendo. Change of pace can build drama and that means a compelling piece.

Fine Tuning:

I had a boss once who told me, “Getting it to 95% could take you an hour, but then trying to get it to 100% could take another 3.” That made so much sense to me. As artists, we want everything to be perfect, but 95% of your best effort infused with the passion you bring to the mic every day is going to produce a great piece of work.

I met Cliff Zellman in 2011 and we immediately became good friends. We share similar points of view on nearly everything audio related. Cliff is a grammy winning producer who works in the fast paced world of automotive commercial production through the Texas based company Radiovision.
.

Mixing VO with music and sound effects:

I try to carve out the center of the mix a bit, leaving plenty of room for the VO in the middle.  I listen for dominant frequencies within the center of the stereo music bed and drop them slightly using a good stereo-linked parametric EQ. Then I use a touch of side-chain compression on the music bed, using the voice as a trigger. Just a touch, maybe -1 or -2 db.

Reading for an audition:

Imagine what the visuals might be doing. Some scripts may have a column for video direction, but most audition scripts won’t. Look for clues in the script. Let the casting director know you understand the “layers” of the script.

Keep it clutter free!

Working in a clutter free environment is much more conducive to creativity then working amidst chaos. Less distractions can keep you in that “creative zone” easier and longer. This also goes for your computer’s directories and files. Just remember KICK (keep it clean, kid).

When mixing demos, commercial spots or working on audio productions of any kind here are some tools that I use as well as some things that I keep in mind:

Layering:

Layers of sounds are critical in audio production as we do not live in a world where only one sound at a time is occurring. Taking environment and sound location (left, right, up, down, forward, back) into consideration are critical to creating a realistic environment. Always listen to the world around you, so you can recreate that world more accurately in audio production.

For drama, sounds such as an explosion (for example) are usually not simply an explosion sound effect. They are far more exciting when multiple layers of sounds are brought together. An audio explosion might include an impact sound, the reflected concussion from the impact,  the sound of the low end boom and trailing rumble and perhaps even a subtle musical drone may be layered together to create a dramatic … BOOM!.

Timing:

The seventh dimension of recorded sound is time. Frequent changes in dynamics, tone and pacing hold the listener’s attention and make listening entertaining and fun.

Set limits:

Artists of the past were forced to come up with creative solutions because they were limited by the technology of the time. Now that computers make nearly anything possible in the audio realm, it is important to set limits and know when to call a project “done.”

Audio production requires practice, experimentation, a proper listening environment … and is one of the most fun and creative aspects of this business.

If you have tips, tricks, questions please leave a comment below.
Filed Under: Audio Production Tagged With: 4VO, audio engineers, Audio Production, Cliff Zellman, Dan Friedman, Dan Gustafson, demos, Recording, Sound Advice Voiceover From an Audio Engineer's Perspective, sound4vo, VO, VO directing, voice over, voiceover, voiceover book, voiceover recording, voiceover talent

Welcome to Voiceover… Audio Editor

April 23, 2014 by Dan Friedman

logo 4voOver the last couple of decades, technology has made many things a whole lot easier… unless you are a voice actor.

WAIT!… Did I read the correctly? Seriously, what could be easier than being a voice actor? Look at all that we can do thanks to technology. We communicate around the world and with the world, sometimes instantly. We have the ability to work from home. We can record digitally and send audio to clients without ever going to the mailbox. Technology has made it MUCH easier.

Don’t get me wrong, working as a voiceover talent is rarely grueling. But the responsibilities that we have today go far beyond the days of pulling up to the studio in a limousine, talking into a microphone for a few minutes and walking out with a wad of cash (at least that is how many of the long-timers portray the “good ol’ days”). While that image may be somewhat hyperbolic, it is closer to the truth of what this business was like twenty or thirty years ago than how it is today.

Now, in our digital world, one of the skills that a voice actor must have is the ability to edit audio. This is a task that was once reserved for men wearing lab coats. The fundamental tasks involved in editing audio are not much different than those used in editing a word document… cut, copy and paste. However, editing audio involves significantly more time. It also requires developing the most important skill of them all, listening.

There are several reasons why basic editing skills are critical to helping you along your voiceover journey.

First, auditions. Clearly, it would be a bad idea to send auditions with mistakes. Those need to be edited out.

Second, general clean-up. Nobody wants to sort through long audio files with several minutes worth of useless material. It is best to send audio that is somewhat clean and free of coughing, sneezing, small talk, and opinions about the script you are reading, or anything else that will do nothing more than take up space and will never be used in production.

Third, it will help to develop your listening skills. It is critical that you not only use your eyes to edit portions of a waveform that you are able to see, but that you also use your ears to ensure that your edited audio sounds cohesive and that it flows naturally. The end result shouldn’t sound as though the audio was edited. Listening is the only reliable way to identify issues involving spacing, tempo and matching.

Lastly, and this may be most important reason, learning to edit your audio will provide you with a solid understanding of how laborious the task can be. It will reinforce the idea that scripts and/or copy should be read as cleanly as possible. The performance and the messages (written and unwritten) should come from you the voice talent, not as a result of extensive editing.

Editing audio is the least creative aspect of our jobs as voice talent, audio engineers and audio producers. It can be tedious work. Editing too quickly can lead to mistakes. Editing too slowly is no way to provide good service to your clients. It requires an unwavering attention to detail, accuracy, precision, and patience. This is especially true when it comes to long form narrations, medical narrations and audio books.

As a voice talent, you should also spend some time learning to become an audio editor. While you may never become an editing ninja, having a general understanding and appreciation for the task is essential. If editing is a task you are uncomfortable doing or for which you simply do not have the time, hire someone who can do your editing for you.

Overall, technology really has made everything a whole lot easier… yes, even for voice actors. 😉 Be thankful that audio editing no longer has to be done with tape, grease pencils and razor blades.

Filed Under: Audio Production Tagged With: 4VO, audio editing, audio engineers, sound4vo, voiceover

Recording Magazine’s Room Acoustics Series Part 5

September 28, 2011 by Dan Friedman

Recording Magazine sends out a newsletter to its subscribers every few weeks. The newsletter is (coincidentally) titled “Sound Advice” and this month it features the fifth in a series about room acoustics. Room acoustics is one of the biggest concerns for Recording Magazine readers. I know that this is also a big issue for those of you in the voiceover world. I asked permission to reprint this newsletter (and will ask to reprint the others in the series as well) so that those of you with home studios can also benefit from the information. I want to personally thank Brent Heintz, VP/Associate Publisher for granting permission, allowing me to share this great information with you.

Please visit Recording Magazine‘s website and Facebook Page.

Catch up or skip ahead: Part 1, Part 2, Part 3, Part 4, Part 6, Part 7, Part 8.

Here is the fifth newsletter in the series on Room Acoustics:

Welcome to Sound Advice on Acoustics! For the past several months we’ve been dealing with the basics of controlling bass buildup in rooms, using ratios of room dimensions and active bass trapping and other room treatments. Bass is by far the hardest problem to deal with in tuning a room, and with it under control, we can now turn our attention to the mids and highs. Read on…!So far we’ve considered the effects of low-frequency waves in the room. There are other issues, related to the propagation of mid and high frequencies. When a mid- or high-frequency sound wave moves through a room, it eventually hits one of the various boundary surfaces (walls, ceiling, floor). When this occurs, the sound wave is either absorbed, transmitted, or reflected.

Absorption means that some or most of the wave’s energy is converted into heat. Transmission means that the wave has some of its energy passed—through the wall, for example. Reflection means that most of the wave’s energy is directed back into the room.

This will happen repeatedly as the sound wave hits various surfaces until all its energy is eventually dissipated.

A room where all the surfaces are completely absorptive sounds dead and unnatural, and is unsuitable for music-making or listening. Such a room, called an anechoic chamber, would be used for testing purposes, as in the manufacture of loudspeakers for example, to isolate the sound quality of the speaker under test from the room effects. An overly reflective room is also not ideal—too many reflections tumbling around the room obscure the clarity of music or speech (see below).

An ideal room strikes the right balance between the original sound from the source (i.e. instrument or loudspeaker) and the amount of reflected sound present. Furthermore, it is desirable for the reflected sound to be distributed as evenly as possible throughout the room, providing a comfortable and pleasant sense of ambience (liveness). This even distribution of reflected sound energy is called , and is generally desirable, as we’ll see. But along the road to this ideal room, there are many pitfalls that we’ll now examine.

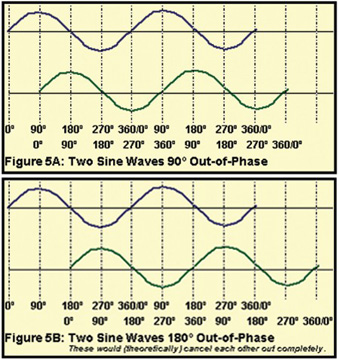
Reflection of sound waves is the behavior we’ll be most concerned with in the next few paragraphs. Just as happens with lower frequencies, when mid- and high-frequency waves reflect back into a room, the positive and negative peaks of the direct (original) sound waves and those of the reflections will cancel and reinforce. This happens because the reflections are delayed in time relative to the direct sound, causing their positive and negative peaks to be offset from those of the direct sound, which results in the interference (see Figure 5 for an illustration of this).

FIG:5A AND FIG:5B
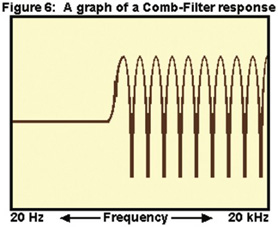
In describing this, if we express the duration of a single cycle of a wave in measurements of phase, the delayed reflections as shown in Figure 5 can be said to be “out of phase” with the original sound. This phase-induced delay, or phase shift, is inevitable in any normal reflective environment.The short wavelengths of mid and high frequencies means that these cancellations and reinforcements occur more frequently all throughout the room rather than being clearly localized to specific broad areas as with standing waves. In a typical room, many complex interferences like this at higher frequencies result in changes in the frequency balance of sound in that room, as illustrated on a frequency response graph in Figure 6. This is called a comb filter response.
FIG:6

While this resulting frequency response may look very ragged, in actuality our hearing systems tend to average out and largely gloss over these subtle, myriad cancellations and reinforcements, and instead may perceive this as a not unpleasant coloration of the sound in a casual listening environment.

However, a recording studio is not a casual listening environment. For example, we depend on what we hear in the control room to make important decisions about the way the sounds in a recording blend and balance. We need to hear exactly what’s in the recording, not a “pleasantly colored” reproduction. Consequently, we need to exert some degree of control over any such effects that impact the neutrality of the monitoring environment.

With all this knowledge under our hats, it is time to look at another fundamental (excuse the pun) aspect of acoustics: how we hear. Next time: a crash course in how our ears and brains interpret sound. See you then!

Filed Under: Audio Production Tagged With: audio engineers, Dan Friedman, home studio, Recording, Room acoustics, sound advice, VO, voiceover

10 Tips To Get the Most From Your Voiceover Session

July 1, 2011 by Dan Friedman

home studio, voiceover sessionYour advertising dollars and your time are important to you. Do you know how to get the most from your voiceover session? Here are my 10 Tips For Getting the Most From Your Voiceover Session.
1- Choose Wisely – Who you choose to deliver your message is the first and possibly most critical decision you’ll make. The voice should personify the attitude and style of your company, product or character and should relate to your target demographic. Keep in mind that the talent should be able to communicate your message quickly and efficiently. Choose a voice talent who can deliver your copy with few mistakes or pickups. Just because audio editing is easier and faster than ever, doesn’t mean extensive editing should be required to get the result you want.

2- Check Your Script – Before your session, read your script out loud and use a stopwatch to time it. This process will help ensure that you’ve fixed any mistakes, grammatical errors and any other stumbling blocks that the voice over talent may encounter. Using a stopwatch while reading aloud will prepare you for the possibility that you may need to cut or add copy to fit your message within the time limits required for radio and TV commercials.

3- Formatting – The way your script is formatted plays a big role in the ease in which it can be read. Double spacing allows room to make copy edits when necessary. Use of punctuation is a must. Also be aware that WRITING IN ALL CAPS IS MORE DIFFICULT TO READ. Only use ALL CAPS, bold type, italics or underlines to indicate emphasis.

4- Numbers – Using actual numbers (1,2,3) rather than writing numbers (one, two, three) is helpful. However, in the case of a monetary value that is complicated to say or that can be said multiple ways, writing the number the way you would like it said is best.

5- Communicate – Communication is what this is all about… right? Let your voice talent know right from the beginning what your ideas are for your script and the approach you had in mind. Most of the time, the copy itself will indicate what approach the voice talent will need to take. Other times several approaches could be considered viable options. This brings us to…

6- Be Flexible – While you were getting ready for the session to begin, the voice talent was also preparing. Professional voice over talent will look over the script, read it to themselves, then read it aloud and anticipate what delivery will be best based on the script, the client, and any written direction that may have been provided. Oftentimes, the talent’s approach will be very close to what you were thinking. However, the talent may also deliver something slightly different or even completely unexpected. These differences could lead to results that are better then what you had imagined. Be open to what the talent brings to the table. Its one of the reasons you chose him or her.

7- Ask For Help – The audio engineers, producers and the voice talent are all there to help you get the most out of your voiceover session. Everyone involved wants the production to be a success. If while in a recording session, you are not quite sure about direction, script construction, copy edits, or have questions or concerns about the audio itself, then allow the talents and experience of these professionals to help you achieve your goals.

8- Be Specific – Vague terminology is confusing and not very helpful since it often requires further explanation anyway. “Make it blue” is not a clear direction and can be interpreted in several ways. “Bigger smile” and “descend on that word” are examples of very precise directions that the voice over talent can easily understand.

9- Keep it Positive – Everyone appreciates positive feedback. If the talent is communicating your message effectively, let them know it.

10- Make It Fun – The best and most memorable recording sessions are the fun sessions. They usually involve fun, creative scripts and people who love listening to their productions come to life. Even if the script is informational and straightforward, there is no reason the session can’t be fun while the work gets done. Sometimes, it can be so much fun… it seems strange to call it work. How’s that for getting the most out of a session?

Filed Under: Voiceover Tips & Advice Tagged With: 4VO, audio engineers, Dan Friedman, Sound Advice Voiceover From an Audio Engineer's Perspective, sound4vo, VO, voice over, voiceover book, voiceover session, voiceover talent

Why? Ask and Answer This Simple Question

April 20, 2011 by Dan Friedman

studio microphonesWhy am I writing this blog post? Because I want to remind you to take the time to stop and consciously ask yourself, “why?”.  “Why?” is a question that we often forget to ask ourselves as we go about our day or do our jobs. Typically, we either know the answer (or think we do) based on past experience or we simply do what we always do out of habit. We also have a tendency to do things because someone told us to, but without asking ourselves why doing what they said is the right thing to do. Taking the time to ask and answer this simple question can be very enlightening. It can also help you make better decisions about gear, deliveries, production and maybe even your life… but today, we’ll just focus on your career.

If your shopping for new gear ask yourself:

Why do I need new gear?

Why am I considering this microphone?
Why do I like this mic preamp?

If you’re in the booth reading a script ask yourself:

Why am I using this emphasis or these inflections?
Why is this the direction that has been given?
Why is this the right delivery?

If you are doing editing and production ask yourself:

Why am I using several compressors, 2 EQs and a limiter on this channel?
Why does this take sound better than that other one?
Why will this music bed work better than another one?

If you are directing, writing or preparing for a voiceover session ask yourself:

Why is this the right voice for my production?
Why don’t I try reading this out loud and use a stopwatch to see if it fits in time?
Why is this talent taking 42 takes to read my :05 tag?

Sometimes the answer is obvious and you can answer the question of “why?” easily. Sometimes it leads to more questions. Either way, taking the time to consciously ask often produces more definitive answers and ultimately greater awareness. While we rarely stop and take the time to ask ourselves this most basic question, doing so can often change the way we look at what we do and how we do it. It keeps us thinking, growing and improving. Why would anyone question that?

Filed Under: Voiceover Tips & Advice Tagged With: audio engineers, Dan Friedman, microphone, Recording, sound advice, VO, voice, voice over, voiceover

Room Acoustics Series… Thanks Recording Magazine

April 19, 2011 by Dan Friedman

Recording Magazine sends out a newsletter to its subscribers every few weeks. The newsletter is (coincidentally) titled “Sound Advice” and this month it features the first in a series about room acoustics. As you will read, room acoustics is one of the biggest concerns for Recording Magazine readers. I know that this is also a big issue for those of you in the voiceover world. So, I asked permission to reprint this newsletter (and will ask to reprint the others in the series as well) so that those of you with home studios can also benefit from the information. I want to personally thank Brent Heintz, VP/Associate Publisher for granting permission, allowing me to share this great information with you.

Please visit Recording Magazine‘s website and their Facebook Page.

Skip ahead to Part 2, Par1 3, Part 4, Part 5, Part 6, Part 7, Part 8.

Here is the newsletter:

Welcome to Sound Advice on Acoustics! In a recent survey of our readership, the number one answer to the question, “What do you feel most limits the quality of your home recordings?” was “Room acoustics.” There’s a lot to learn about the subject of acoustics, and the more you know, the more tricks you can master to get your room sounding its best.

New York-based producer/engineer Joe Albano brings us the first installment of a multipart primer on acoustics to get this newsletter started, and over the coming months we’ll bring you all kinds of useful information on acoustics! Here we go…

***

We’ll start our look at acoustics by briefly reviewing the basics of how sound works.

Sound is created by vibrating objects like guitar strings, drum heads, vocal cords, or loudspeakers; it travels through the air in waves. The waves are alternating areas of higher and lower air pressure; everything we do to control the sound of a room boils down to managing what happens to those waves as they move around the room.

When we talk about a sound wave or audio signal, it has some properties that we’ll need to understand.

1. There’s its amplitude (what we perceive as “loudness”). This is measured indecibels or dB. The decibel is a relative measure of loudness, and needs a reference point to have an absolute value (we talk about 0 dB Full Scale in digital audio all the time, for example). In acoustics, we’re usually talking about dB SPL or Sound Pressure Level, from the threshold of human hearing at 0 dB SPL all the way up to very loud sounds above 100 dB SPL.

2. There’s its frequency, or how many times per second the wave compresses air; it’s measured in wave cycles per second, or Hertz (Hz). We say that the A above middle C has a frequency of 440 Hz.

3. There’s its waveshape. All sound waves are made up of a combination of basic simple waves called sine waves. There’s the lowest frequency wave, thefundamental, and then a mix of higher-frequency information blended into it calledovertones. Every sound has a different blend of overtones over time; that’s what makes a flute playing a C sound different than a horn or guitar playing the same note.

Some overtones are multiples of the fundamental—if the fundamental is at 55 Hz, there may be overtones at 110, 220, 440, etc.. These overtones are called harmonics. Other overtones are inharmonic, without this clear relationship to the fundamental. We hear them as clangorous or noisy, like the attack of a ringing bell or the chiff of breath on a flute.

4. There’s its wavelength… how long a distance you can measure between the start of one wave and the start of the next. This is a really important property, because how a sound wave “fits” into a room has a direct bearing on how loud or controllable it is!

We can calculate the wavelength of any wave if we know its frequency and its speed; this applies to light waves, sound waves, any kind of wave. The formula is simple:

Speed = Frequency times Wavelength, so Wavelength is Speed divided by Frequency.

Now, we know the speed of sound in air at sea level; it’s 1130 feet per second (fps). So a sound wave’s wavelength in feet equals 1130 fps divided by the frequency in Hz.

Here’s a couple of examples: A low E on a guitar has a fundamental frequency of 82 Hz; its wavelength is 1130 / 82 = 13.8 feet. That’s a pretty long wave. Compare that with the highest C on a piano. Its fundamental frequency is 4000 Hz, so its wavelength is 1130 / 4000 = 0.28 feet, or a bit over 3 inches: a much shorter wave.

So, as you can imagine, when we play back music on loudspeakers or have a set of instruments playing in a room, there are all kinds of waves bouncing around at all kinds of wavelengths. When two of them happen to line up so that a high pressure area of one is at the same place as another high pressure area, the overall pressure will be still higher, i.e., the wave will be louder. And when two of them line up so that a high pressure area of one is at the same place as a low pressure area of another, they’ll partly cancel out and the wave will be softer.

In other words: in any given room where there’s sound, certain frequencies will be louder than you think they’d normally be, and certain frequencies will be softer. The room won’t be accurate in representing the actual sound being played, and if you track and mix in such a room then play your music back elsewhere, it won’t sound the way you think it should. Presto: you now know why acoustics and sound control in rooms is so important!

Next time, we’ll start to look at how these properties of sound combine to create real-world acoustic problems. See you then!

Filed Under: Audio Production Tagged With: audio engineers, Dan Friedman, Recording, sound advice, studio, VO, voice over, voiceover

  • Page 1
  • Page 2
  • Go to Next Page »

Primary Sidebar

Search Blog

Categories

Want to see how well we work together first? LET’S DO IT!!

Book a Single Session
Book a FREE Meet & Greet

Follow Sound4VO

Dan Friedman Voice Over Coach & Demo Producer Tiktok

Tip Jar

Have questions on anything related to voiceover? Dan is available for email consultations at no charge. Ask away! If he's able to help you with your problem, tips are greatly appreciated... Use the "tip jar" below to show Dan the love!

Dan Friedman Voice Over Coach & Demo Producer Tiktok

[email protected]

828.551.0891

Dan Friedman Voice Over Coach & Demo Producer Zen and the art of Voiceover Audiobook Cover Img
Buy Now
Dan Friedman Voice Over Coach & Demo Producer Sound Advice Cover Img
Buy Now

RLM CERTIFIED MASTER COACH Since 2021

Dan Friedman Voice Over Coach & Demo Producer RLMC Logo

©2025 Dan Friedman Sound4VO // Voice Over Site by Voice Actor Websites

MENU
  • Home
  • About
  • Demos
  • Coaching4VO
  • Books
  • Services
  • Testimonials
  • Sound4VO Blog
  • Merch
  • Contact