Dan Friedman
Voice Over Coach & Demo Producer
828.551.0891
[email protected]
  • Home
  • About
  • Demos
  • Coaching4VO
  • Books
  • Services
  • Testimonials
  • Sound4VO Blog
  • Merch
  • Contact

Audio Production

Recording Magazine’s Room Acoustics Series Part 6

November 16, 2011 by Dan Friedman

Recording Magazine sends out a newsletter to its subscribers every few weeks. The newsletter is (coincidentally) titled “Sound Advice” and this month it features the sixth in a series about room acoustics. Room acoustics is one of the biggest concerns for Recording Magazine readers. I know that this is also a big issue for those of you in the voiceover world. I asked permission to reprint this newsletter (and will ask to reprint the others in the series as well) so that those of you with home studios can also benefit from the information. I want to personally thank Brent Heintz, VP/Associate Publisher for granting permission, allowing me to share this great information with you.

Please visit Recording Magazine‘s website and Facebook Page.

Catch up or skip ahead: Part 1, Part 2, Part 3, Part 4, Part 5, Part 7, Part 8.

Here is the sixth newsletter in the series on Room Acoustics:

Welcome back to Sound Advice on Acoustics! For the last few installments, we’ve been talking about the basics of room acoustics: how sound moves, room dimensions, and systems for analyzing and dealing with low-frequency problems. As we start to consider the mids and higher frequencies, with the transmission, reflection, and absorption of sound as it travels around our room, we have to have an understanding of how our own hearing systems interpret this barrage of direct and reflected sound. Here we go!

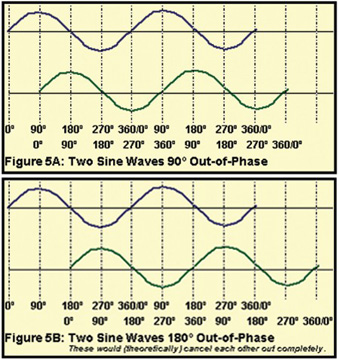
When a direct sound reaches our ears followed by a reflection, how we perceive these two sounds is determined by the arrival time of the reflection. If it arrives less than about 50 milliseconds (thousandths of a second) after the original sound does, we perceive only the original direct sound, but the interference effects contributed by the delayed out-of-phase reflection will color the timbre of that sound.

Our auditory system’s perceptual fusing of the direct and reflected sounds, under the conditions described above, is called the precedence effect (or Haas effect)—the ear integrates all reflections within ~50 milliseconds of the first arrival (direct sound). But if a reflection arrives more than ~50 milliseconds later than the direct sound, it is not perceptually fused with the direct sound and is instead heard as a discrete echo.

The actual threshold of the shift in perception from integration to echoes is gradual between about 25–50 milliseconds, and varies depending on the nature of the original sound. For example, for short percussive sounds with sharp attack transients, the perceptual fusing of direct and reflected sounds may break down at only 20 milliseconds of delay, or even less. (A musician calls this “flamming.”)

The delay, or gap, between the direct sound and the first reflection, as well as the spacing of the other (integrated) early reflections determines the acoustic character (our sense of the size and shape) of the room. If there are enough reflective areas, the later reflections, instead of being heard individually as echoes, build up in density and form reverberation, which continues after the direct sound stops, dying away gradually. Reverberation time (RT60) refers to the time it takes for this reverberant tail to decay by 60 dB. In control rooms this property is usually kept to a minimum by design.

Another aspect of our hearing in regards to direct and reflected sound is described by the “Law of the First Wavefront.” This says that when we hear a direct sound followed by early reflections, our auditory system not only integrates them, but also determines the localization of this combined sound from the direction of the first arriving sound.

So if a sound wave originates from a loudspeaker in front of us and slightly to the left, followed a few milliseconds later by a reflection from the right, we identify everything as coming from the loudspeaker. However, if the reflected sound is about 10 dB or so louder than the direct sound, the localization towards the direction of the first arrival breaks down, the perceived image shifts, and the direct/reflected sound then appears to be spread out between the actual sources.

Another directional aspect of our auditory perception is that reflections from the same direction as the (direct) source can be 5–10 dB louder before being detected than reflections originating from other directions. This is so because the direct sound masks the reflections coming from the same direction. So strong reflections from the sides of the room (lateral reflections) can be more problematic than those from the front.

The presence of early reflections, echoes, and reverberation in a room is normal and adds fullness and a sense of spaciousness to music, but in a control room, too much of this can be a problem. Recordings being monitored already contain recorded ambience, or else they may have artificial ambience added to them, but either way we need to hear the reflections in the recordings more than the ambience of the control room itself. And of course, reflection-based effects like image shifts and colorations of the direct sound also obscure aspects of the recorded sound like panning and tonal balance, so reflected sound must be tightly controlled to insure a good monitoring environment.

If we’re going to try to control or eliminate certain reflections in a room, we should trace their pathways as they travel through the room. When a sound wave is reflected off a room surface, there is a well-known rule which describes the propagation of that reflected wave: “The angle of incidence is equal to the angle of reflection.” This means that for whatever angle a sound wave strikes a reflective surface, it will bounce off that surface at an equal but opposite angle (see Figure 7). You can see this for yourself by bouncing a flashlight beam off a mirror—and this is actually the basis for a handy means of dealing with these reflections that we’ll discuss next time (which we call the “mirror trick”).

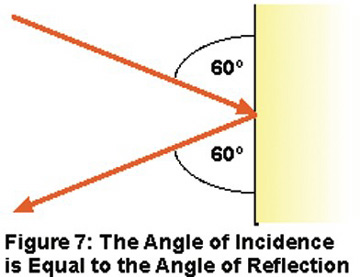
The most problematic reflections are the earliest and therefore the strongest. By applying the above rule, reflection pathways can be predicted, and strong reflections can usually be traced from the source (i.e. loudspeaker) to the positions on nearby reflective surfaces where these worst offenders originate. Next time we’ll begin to discuss how to deal with these problem reflections, and we’ll teach you the mirror trick as well. See you then!

Filed Under: Audio Production

Executing a Vision in Voiceover

October 25, 2011 by Dan Friedman

Last Friday I found out that I won Edge Studios Weekly Script Recording Contest. How awesome is that? While I’m really excited about winning and I certainly had no expectation that I would, I’m also not surprised that my entry was successful. I had a clear “vision” of what my production was going to sound like when it was finished… before I even began to work on it. I believe that having that vision is what led to the success of my contest entry. That vision and the steps I took to turn it into a reality, is what this blog is all about.

Creative people often have a very good idea of what something will look or sound like before they even get started. That “vision” (for lack of a better word when it pertains to audio) is what guides you as you begin to put the elements together and execute your plan. But first, just as an artist needs a canvas, the director’s notes provide the framework and foundation for everything that follows.

Here are the notes from the Edge Studio website:

Director’s Notes:
“We’re looking for a talent who can provide fully produced spots with a new sound for some of our sport promos. The delivery should be energetic, hip, and confident — not gimmicky or conventional. We will want fully produced mp3s with music and sound effects (when appropriate). This audition should be 5 seconds and should be fully produced. Please slate your full name and “CBS Sports Telecast 1 audition”. Thank you.”

Being able to work within the guidelines provided is absolutely essential to success in this case. Just as a painter is (usually) limited to the space provided by canvas, TV and radio are limited by time. In this instance, the most strict guideline given was that the audition must be 5 seconds. There are some rules that can be broken… a time limitation on a broadcast production is not one of them.

A key element to not only having vision, but also knowing you can turn it in to reality, is having the right tools available to execute it. Having good quality tools allows a carpenter to build a house, a deck or install hardwood floors faster and easier then if they simply had a hammer and a saw. Good tools also help to ensure better results. The tools required for this audio production are: my voice, studio equipped with good quality gear, music, sound effects and powerful computer with multitrack DAW.

For voiceover and voiceover production, your vision for the final product must originate from the script. The script determines the voice delivery as well as the production elements that will be used to maximize the effectiveness of the full production.

Here is the script from Edge Studio’s website:

“This CBS Sports telecast is brought to you by Wells Fargo…. together we’ll go far.”

This script, as short as it is, provides a great deal of information. Of course “CBS sports” and “Wells Fargo” are important because they are the client’s names, but they’re also key to creating a vision for the overall production. Since this is a fast “sports” promo, strong and powerful music would seem appropriate. I chose two cuts that I believed would be a good fit. Because Wells Fargo is known for their horse and carriage theme, galloping horses make a great sound effect and help draw attention to the sponsoring client. As you will later read, Edge suggests using crowd noise or a sports team sound effect. While this would also be appropriate (and I had thought about it), my vision included the horses and I believed crowd noise could clutter the final mix. Using the horses also gave me the opportunity to illustrate the final line in the spot, “together we’ll go far” by panning the horses, with them entering the soundscape on the left and leaving it on the right.

My last step before getting into the booth to do the voiceover was to import a couple of “swish” sound effects and a “low drone” into my DAW. I would add these to give the spot more movement and create additional drama. They are only slightly audible in the final mix and are there to provide a sensation more than a noticeable sound.

After getting into the booth and recording the line ten times, I chose my second take. However, all of the takes were longer than five seconds, so time compression was an absolute must. Once that was done and I verified that the voiceover was still sounding good, it was time to mix.

First, I laid my voice track over the two music cuts I had chosen and decided which cut was working best. I then edited the music track to fit the 5 second time frame. Next I added the galloping horse sound effect, put it in position, edited that to fit the space I wanted to fill and panned it from left to right. Next, I added the low drone and swish sound effects. I mixed in the voice track and used dynamic compression, EQ and a little reverb to give the voice some additional separation and brilliance. Lastly, I mixed all the tracks down through a master limiter and exported it to a stereo MP3 file. Throughout this process I was adjusting levels and carefully listening to every element and every tweak. In the end, I had produced a spot that matched my “vision” almost exactly.

Here were the comments on my entry from Edge Studios:

Great job! His slate is clear and delivered in the same style as his audition. His mix is very solid. And he’s one of the very few to come in at the requested 5 seconds. Adding sound effects of a crowd cheering and/or a sports team playing would have made this audition even better (although doing so was not necessary). Nice work danfriedman!

Clear visions of the final production don’t always come easily, but it is certainly helpful when they do. In voiceover production, vision will usually begin with the script and the delivery, but truly come into focus as all of the elements are brought together. But what is even more important than your vision as the voice talent or the production engineer, is the clients vision for the final production. If your vision for the voiceover or the production doesn’t match that of your clients, it is critical that you have the ability to change your point of view. After all, beauty is in the eye… ahem… ear… of the beholder.

CBS Sports1 Audition
5570
https://sound4vo.com/wp-content/uploads/2023/05/DanFriedman_CBS_Sports1_Audition.mp3

Filed Under: Audio Production, Sound4VO News, Voiceover Tips & Advice Tagged With: 4VO, Dan Friedman, Edge Studios, VO, Voiceover Production

Voiceover Processors – Hardware vs Software Revisited

October 11, 2011 by Dan Friedman

There is a lot of talk about mic modelers in social media today. A while back, I was asked the question in regards to voiceovers, which processors (i.e.- compressors, EQ, etc.) are better: hardware or software? Well my answer to that question, also applies to mic modelers. The tools available in both formats have advantages and disadvantages. While nothing can truly substitute for the real thing, this doesn’t mean that a simulation can’t be useful, effective or even very good. Whether we are talking about microphones or other audio processors, there are hardware models that sound great and perform exceptionally well, and then there are some that do not. The same is true for software versions.

Consistency is critical in voiceover work, so a clean unprocessed signal during recording is usually ideal. As a voice talent you generally will not, or should not, be using processors when recording, and if you are it should be very minimal and the same every time. Therefore, you really don’t need a great deal of choices.

If you are a voice over talent working from your home studio, chances are that software versions will be your best or maybe your only option. Besides not really needing many choices, it just doesn’t make financial sense for someone who only does voiceover work to own a vast array of microphones, hardware or rack gear. When considering processors, hardware boxes will take up valuable space in what are often small spaces to begin with. Another downside is that they give off a great deal of heat (especially tube gear) making tight spaces more uncomfortable.

Does hardware sound better than software? Not necessarily. As an engineer, I would love to have full racks of hardware options at my disposal. Each helps to create different sounds, characteristics and textures within a mix. But would having racks of gear stop me from using software versions? Not likely.

Software versions of processors perform the same functions as their hardware counterparts, and like their hardware counterparts, they also have different sounds, characteristics and textures of their own. These characteristics vary from processor to processor in software versions just as they do in different brands and types of hardware. Software versions meant to emulate specific models of rack gear can come very close to capturing that hardware sound. But they will still have their own sound and character that make them different, not necessarily better or worse, than the hardware they emulate.

If it is great sound as well as a variety of sounds you are going for, then having both hardware and software is the way to go. However, if your space and budget are limited, then having a variety of software versions will probably be just fine for your needs. The bottom line is this, whether your processing options come from hardware or software, the tools are only as good and as effective as the person using them. Get the best sounding tools you can afford, learn how to use them and most importantly… use your ears.

Filed Under: Audio Production, Studio & Gear Tagged With: 4VO, Dan Friedman, Sound Advice Voiceover From an Audio Engineer's Perspective, sound4vo, VO, voiceover recording

Recording Magazine’s Room Acoustics Series Part 5

September 28, 2011 by Dan Friedman

Recording Magazine sends out a newsletter to its subscribers every few weeks. The newsletter is (coincidentally) titled “Sound Advice” and this month it features the fifth in a series about room acoustics. Room acoustics is one of the biggest concerns for Recording Magazine readers. I know that this is also a big issue for those of you in the voiceover world. I asked permission to reprint this newsletter (and will ask to reprint the others in the series as well) so that those of you with home studios can also benefit from the information. I want to personally thank Brent Heintz, VP/Associate Publisher for granting permission, allowing me to share this great information with you.

Please visit Recording Magazine‘s website and Facebook Page.

Catch up or skip ahead: Part 1, Part 2, Part 3, Part 4, Part 6, Part 7, Part 8.

Here is the fifth newsletter in the series on Room Acoustics:

Welcome to Sound Advice on Acoustics! For the past several months we’ve been dealing with the basics of controlling bass buildup in rooms, using ratios of room dimensions and active bass trapping and other room treatments. Bass is by far the hardest problem to deal with in tuning a room, and with it under control, we can now turn our attention to the mids and highs. Read on…!So far we’ve considered the effects of low-frequency waves in the room. There are other issues, related to the propagation of mid and high frequencies. When a mid- or high-frequency sound wave moves through a room, it eventually hits one of the various boundary surfaces (walls, ceiling, floor). When this occurs, the sound wave is either absorbed, transmitted, or reflected.

Absorption means that some or most of the wave’s energy is converted into heat. Transmission means that the wave has some of its energy passed—through the wall, for example. Reflection means that most of the wave’s energy is directed back into the room.

This will happen repeatedly as the sound wave hits various surfaces until all its energy is eventually dissipated.

A room where all the surfaces are completely absorptive sounds dead and unnatural, and is unsuitable for music-making or listening. Such a room, called an anechoic chamber, would be used for testing purposes, as in the manufacture of loudspeakers for example, to isolate the sound quality of the speaker under test from the room effects. An overly reflective room is also not ideal—too many reflections tumbling around the room obscure the clarity of music or speech (see below).

An ideal room strikes the right balance between the original sound from the source (i.e. instrument or loudspeaker) and the amount of reflected sound present. Furthermore, it is desirable for the reflected sound to be distributed as evenly as possible throughout the room, providing a comfortable and pleasant sense of ambience (liveness). This even distribution of reflected sound energy is called , and is generally desirable, as we’ll see. But along the road to this ideal room, there are many pitfalls that we’ll now examine.

Reflection of sound waves is the behavior we’ll be most concerned with in the next few paragraphs. Just as happens with lower frequencies, when mid- and high-frequency waves reflect back into a room, the positive and negative peaks of the direct (original) sound waves and those of the reflections will cancel and reinforce. This happens because the reflections are delayed in time relative to the direct sound, causing their positive and negative peaks to be offset from those of the direct sound, which results in the interference (see Figure 5 for an illustration of this).

FIG:5A AND FIG:5B
In describing this, if we express the duration of a single cycle of a wave in measurements of phase, the delayed reflections as shown in Figure 5 can be said to be “out of phase” with the original sound. This phase-induced delay, or phase shift, is inevitable in any normal reflective environment.The short wavelengths of mid and high frequencies means that these cancellations and reinforcements occur more frequently all throughout the room rather than being clearly localized to specific broad areas as with standing waves. In a typical room, many complex interferences like this at higher frequencies result in changes in the frequency balance of sound in that room, as illustrated on a frequency response graph in Figure 6. This is called a comb filter response.
FIG:6

While this resulting frequency response may look very ragged, in actuality our hearing systems tend to average out and largely gloss over these subtle, myriad cancellations and reinforcements, and instead may perceive this as a not unpleasant coloration of the sound in a casual listening environment.

However, a recording studio is not a casual listening environment. For example, we depend on what we hear in the control room to make important decisions about the way the sounds in a recording blend and balance. We need to hear exactly what’s in the recording, not a “pleasantly colored” reproduction. Consequently, we need to exert some degree of control over any such effects that impact the neutrality of the monitoring environment.

With all this knowledge under our hats, it is time to look at another fundamental (excuse the pun) aspect of acoustics: how we hear. Next time: a crash course in how our ears and brains interpret sound. See you then!

Filed Under: Audio Production Tagged With: audio engineers, Dan Friedman, home studio, Recording, Room acoustics, sound advice, VO, voiceover

Recording Magazine’s Acoustics Series Part 4

September 2, 2011 by Dan Friedman

Recording Magazine sends out a newsletter to its subscribers every few weeks. The newsletter is (coincidentally) titled “Sound Advice” and this month it features the fourth in a series about room acoustics. Room acoustics is one of the biggest concerns for Recording Magazine readers. I know that this is also a big issue for those of you in the voiceover world. I asked permission to reprint this newsletter (and will ask to reprint the others in the series as well) so that those of you with home studios can also benefit from the information. I want to personally thank Brent Heintz, VP/Associate Publisher for granting permission, allowing me to share this great information with you.

Please visit Recording Magazine‘s website and Facebook Page.

Catch up or skip ahead: Part 1, Part 2, Part 3, Part 5, Part 6, Part 7, Part 8.

Here is the fourth newsletter in the series on Room Acoustics:

Welcome back to Sound Advice on Acoustics! Last month, we talked about how the relative dimensions of a room can make standing waves (modes) better or worse, and introduced special ratios called Golden Means that will help produce the smoothest bass behavior… but all that just tells us where the modes are, it doesn’t make them go away!

This naturally brings us to the question of what to do about these modal issues, once the room has been analyzed. In the case of new room or room-in-a-room construction, following the Golden Mean ratios (we printed a table of them last time) is an excellent place to start.

If space permits, it’s also recommended that room volume (L x W x H) be at least 1500 cubic feet (for example 16′ x 12′ x 8’=1536 cu’)—this will push the lower-order modes down in frequency and provide greater density and evenness in the useful bass range.

In the case of an existing space, however, adjusting room dimensions is, of course, not usually an option. Sometimes, after mapping out the locations of the nodes and antinodes, simply rearranging the location of speakers and listening position in the room can help to avoid being in the path of the most severe artifacts. Examples: Not establishing a critical listening position right up against a wall; placing speakers in a more neutral location.

But while this can help, even good modal spacing and careful room layout isn’t really an adequate alternative to a truly balanced room response for serious use, so in a professional situation the preferred option is to address problematic standing waves with room treatments.

One approach, frequently used in studio construction, is the splaying (angling) of the walls/floor/ceiling, to avoid having the parallel surfaces which give rise to standing waves. However, this will not really eliminate standing waves, but will simply shift their distribution in the room slightly. This may help to reduce the severity of some modes a little, but it will also make it more difficult to calculate and map them out. Unless you have access to computer software to help you map out the room’s response, it’s probably better to stick with a rectangular shape with predictable modal behavior, and turn to other solutions.

Another way to deal with standing waves might be to absorb them. Unfortunately the absorption of low frequencies (by typical porous absorbers that you could easily apply to walls and surfaces) would require depths that are comparable to the wavelengths of the frequencies to be absorbed, which would be impractical.

In practice, the commonly available sheets and tiles you often see in studios are only effective at mid and higher frequencies, well above those at which standing waves form. To absorb low frequencies, with their room-sized wavelengths, the best approach is to “trap” the low frequency waves via the use of cavities at or behind the walls. This approach has given rise to the term “Bass Traps” for some such cavity-based solutions.

A bass trap is a tuned cavity with a depth of a quarter-wavelength of the frequency at which maximum absorption is desired. Such a cavity could be built into one of the parallel walls that are contributing to the formation of a standing wave. The wave would enter the cavity at its point of maximum pressure buildup, at the wall. Inside the cavity, maximum pressure would develop at the back, resulting in zero pressure at the mouth (opening), countering the normal pressure buildup there.

A bass trap will be effective at 1/4 wavelength and odd-numbered multiples of 1/4 wavelength. This technique can be effective, but of course requires some extra depth to be available behind the walls if built in.

Another approach is based on a design called a Helmholz resonator (an example of this is a long-necked bottle). For our purposes this would consist of an opening or series of openings (like the neck of the bottle) into a cavity (or connected series of cavities). The resonant frequency of the cavity is determined by the length of the “neck” and the volume of air in the cavity. Sound is absorbed at and around the resonant frequency (matched to the frequency of a standing wave).

It’s possible to construct your own resonators, usually consisting of a panel with holes or slots in it in front of a cavity (corner placement is a good choice; these can even be free-standing). The exact size and spacing of the holes is the key to “tuning” such a perforated resonator to a particular mode—the formulas involved are not too complex, but there isn’t enough space to really get into the specifics here.

There are quite a few other types of low-frequency absorbers, and if building your own is not feasible, many commercial standalone solutions are available that work very well.

Wow, all that discussion just to deal with the low end! There’s more to deal with next time; see you then…

Filed Under: Audio Production, Studio & Gear

Recording Magazine’s Room Acoustics Series Part 3

August 1, 2011 by Dan Friedman

Recording Magazine sends out a newsletter to its subscribers every few weeks. The newsletter is (coincidentally) titled “Sound Advice” and this month it features the third in a series about room acoustics. Room acoustics is one of the biggest concerns for Recording Magazine readers. I know that this is also a big issue for those of you in the voiceover world. Like I did last month, I asked permission to reprint this newsletter (and will ask to reprint the others in the series as well) so that those of you with home studios can also benefit from the information. I want to personally thank Brent Heintz, VP/Associate Publisher for granting permission, allowing me to share this great information with you.

Please visit Recording Magazine‘s website and Facebook Page.

Catch up or skip ahead: Part 1, Part 2, Part 4, Part 5, Part 6, Part 7, Part 8.

Here is the third newsletter in the series on Room Acoustics:

Welcome to Sound Advice on Acoustics! Last time we introduced the idea of standing waves and modes in a room, and introduced a simple formula for calculating them. In this month’s installment, we’ll run the numbers for a few sample rooms and learn what sorts of relationships between room dimensions are best, and which ones will get you into trouble.To determine what specific modal frequencies will be present in a rectangular room, we can use the simple formula given last time (1130÷2L, where L is the dimension of the room you’re checking) for each room dimension (length, width, height) to find the primary axial modes and their first few harmonics, and list them in a chart—we’ll do that for three rooms.We’ll be looking for two main things: (1) to find and avoid coincidences and near-coincidences (where the same modal frequency develops between two or all three pairs of parallel surfaces), and (2) to achieve relatively even spacing and avoid wide gaps between the frequencies of the modes that are present.Number one is fairly obvious—if the same modal frequency occurs for, say, both height and width, then the imbalances at that frequency will be twice as bad. This will occur if two (or more) room dimensions are the same, or are multiples of each other (the worst-case scenario would be a cube, L=W=H)—one of the examples will illustrate this.Number two is based on two assumptions. First, if a lot of closely- and evenly- spaced modes are present in a room, the overall effect will be more of a general reinforcement of the low frequency range. Second, if a few widely-spaced modes are present, musical notes whose fundamentals and harmonics coincide with these modal frequencies will be altered in timbre and noticeably boosted or attenuated in level relative to other notes.In a bad room, this can be very obvious—imagine a scale played evenly on the bass, with some notes almost dropping out and others booming excessively, depending on the listening position.

There’s no absolute consensus as to what the best distribution of modal frequencies might be. Even spacing is preferable, and it’s been suggested that modal frequency spacing of greater than ~20 Hz will result in audible unevenness, to be avoided or minimized to whatever degree possible.

With this in mind, let’s look at a few simple examples of room mode charts (feel free to analyze your own room this way as well).

We’ll look at the axial modes for three different rooms, first listing the first four axials under the room dimensions, then listing the first twelve axials for each room in ascending order. We’ll arrange the dimensions from greatest (L) to smallest (H) because this makes it easy to spot the numerical relationships.

Room Acoustics Figure 1

As you can see in Figure 4, Room A is not at all ideal: there are wide gaps between modal frequencies, and there are coincidences. Since the 16′ long wall is twice the dimension of the 8′ ceiling, the 2nd (harmonic) mode of the length (70.6 Hz) coincides with the 1st mode between floor and ceiling, also at 70.6 Hz. Since 8, 12, and 16 are all multiples of 4, at around 141 Hz a three-way coincidence occurs, which will be sure to make the imbalance of any notes/harmonics at that frequency really stand out!Room B is somewhat better: there are still some uneven, wide spacings, but there is only one coincidence, at around 141 Hz, and it only involves two modes rather than all three.Room C is even better—the spacings are more even, and there are no exact coincidences.This last set of room dimensions, 15’5″ L x 12’10” W x 10′ H, was based on one of a group of recommended “Golden Mean” room ratios; these ratios have been analyzed to provide the most even modal distribution (of course, in addition to the Axial modes they also take into account Tangential and Oblique modes).Here are a few of these Golden Mean room ratios, from various sources. In theory, it doesn’t matter which number applies to which dimension of the actual room, but building practicalities will mean that the shortest is usually the height; since many control rooms are wider than deep, the other two dimensions could interchangeably be width or length, but for consistency’s sake, let’s list the middle dimension as the width and the greatest dimension as the length of the room.

Golden Ratios, Room Acoustics Figure 2
For a quick idea of how this translates into the real world, assume a room with a 10′ ceiling, and apply the ratios; the formula at the top of the list, for example, yields a room of 10′ x 11’5″ x 13′ 11″ (H x W x L).

We’ll talk more about these Golden Ratios, and what you can do about room modes in terms of practical room treatment, next time. See you then!

Filed Under: Audio Production, Studio & Gear

  • « Go to Previous Page
  • Page 1
  • Page 2
  • Page 3
  • Page 4
  • Go to Next Page »

Primary Sidebar

Search Blog

Categories

Want to see how well we work together first? LET’S DO IT!!

Book a Single Session
Book a FREE Meet & Greet

Follow Sound4VO

Dan Friedman Voice Over Coach & Demo Producer Tiktok

Tip Jar

Have questions on anything related to voiceover? Dan is available for email consultations at no charge. Ask away! If he's able to help you with your problem, tips are greatly appreciated... Use the "tip jar" below to show Dan the love!

Dan Friedman Voice Over Coach & Demo Producer Tiktok

[email protected]

828.551.0891

Dan Friedman Voice Over Coach & Demo Producer Zen and the art of Voiceover Audiobook Cover Img
Buy Now
Dan Friedman Voice Over Coach & Demo Producer Sound Advice Cover Img
Buy Now

RLM CERTIFIED MASTER COACH Since 2021

Dan Friedman Voice Over Coach & Demo Producer RLMC Logo

©2025 Dan Friedman Sound4VO // Voice Over Site by Voice Actor Websites

MENU
  • Home
  • About
  • Demos
  • Coaching4VO
  • Books
  • Services
  • Testimonials
  • Sound4VO Blog
  • Merch
  • Contact