Dan Friedman
Voice Over Coach & Demo Producer
828.551.0891
[email protected]
  • Home
  • About
  • Demos
  • Coaching4VO
  • Books
  • Services
  • Testimonials
  • Sound4VO Blog
  • Merch
  • Contact

Dan Friedman

Voiceover Pick-ups and How To Avoid Them

July 13, 2011 by Dan Friedman

Dan Friedman, voiceover pick-upsIt happened today. I was asked which of the two voiceover talent the client had chosen would be better for a 12 minute narration. “Talent A” and “Talent B” are both seasoned veterans and have great voices and deliveries. The difference is that “Talent B” requires a great deal of time for editing pick-ups, mistakes and fumbled words. On a project this long, the additional time that will be required to work with “Talent B” will be costly to the client. Needless to say, for a job like this, I recommended “Talent A”.

People with stage and live performance experience know that there is only one chance to get it right. Film actors know that film is expensive and multiple takes could become costly. People who have been in the voice over industry for more than 15 years will probably remember working with tape. Tape was also expensive and editing with it was much more difficult and time consuming then digital editing is today. So while many of these expenses and difficulties are less of an issue today, frequent pick-ups are still a tremendous waste of time and can be costly for the client and (as you read in the introduction) for the talent as well.

There is no question that some scripts and styles of reads can be difficult. Fast disclaimers and long scientific or medical narrations can be extremely tricky. But professional voice talent should not struggle with a typical script such as one for a grocery store, car dealership, restaurant, or bank. If the script is written well, a professional voice talent should have little trouble delivering it. It is frustrating when a voice over “talent” is unable to get through more than a few sentences without multiple pick-ups… and don’t even get me started on the editing.

Editing should be a tool for choosing the perfect nuances, eliminating clicks, noises and other anomalies, removing breaths and trimming a read so that it will fit into time constraints. It should not be required to simply get a complete read. The edit desk is not supposed to look like a ransom note (thank you Amy Snively for that analogy).

This is a customer service issue. The time it takes to edit audio full of pick-ups, mistakes, and fumbles can be costly to the client. Voiceover artists who are frequent fumblers require additional time for both recording and editing. Even on straightforward editing jobs, clients as well as voice over talent are often best served using professional audio engineers and editors to edit their audio quickly. When multiple pick-ups are involved, the editors speed is even more important. But even more critical than speed is the engineer’s ability to make disconnected reads sound cohesive (deliveries lacking cohesion can occur easily when multiple pick-ups are involved). His or her editing experience often produces better results than the client or talent can achieve when trying to edit the audio themselves.

Everyone makes mistakes. It is a fact of life. However, if you as a voice over talent routinely have more pick-ups in your reads than an auto dealership in the South has pick-up trucks, then (like those trucks) you’ve got work to do.

Here are some tips:

1- Begin by getting your eyes checked regularly. This should be obvious. If you can’t see the script, how can you possibly read the script?

2- Prepare. Clients don’t always send the script in advance. But, when they do, as a professional voice talent you have a responsibility to prepare. Read the script, mark it up appropriately and ask questions (if you have any) before you start recording.

3- Mentally focus. Do whatever you need to do to prepare yourself to perform the read you are about to deliver. Deep cleansing breaths, reading silently to yourself for a couple of seconds, imagine someone with who you will communicate the message, whatever it is that works for you. Once you are focused… stay focused.

4- Don’t try to memorize. Don’t take your eyes off the page and think you’ll remember what was there. Read the words in front of you.

5- Anticipate. Especially if you didn’t get the script in advance. Anticipate what is coming next based on the words, sentence structure and your experience.

6- Break it up. Break the word or phrase up into smaller components and then pull it together as you repeat it.

7- Repetition. If a word or phrase is difficult for you to say, repeat it over and over again until you get comfortable with it.

8- Adjust your speed. Subtle changes in the speed of your delivery can make it easier to say difficult words or phrases.

9- Practice. Practice reading, out loud and fluently, all of the time.

10- Relax. This is your job. It is what you do. Relax… and make it happen.

Remember, this is a customer service issue. Voice talent who read fluidly, communicate effectively and require minimal editing provide a better experience for their clients. They also save the client valuable time and money.

If you have any additional thoughts or tips, I’d love to hear from you.

Filed Under: Voiceover Tips & Advice Tagged With: 4VO, Amy Snively, Dan Friedman, Sound Advice Voiceover From an Audio Engineer's Perspective, sound4vo, VO, voiceover, voiceover book, Voiceover Coaching

10 Tips To Get the Most From Your Voiceover Session

July 1, 2011 by Dan Friedman

home studio, voiceover sessionYour advertising dollars and your time are important to you. Do you know how to get the most from your voiceover session? Here are my 10 Tips For Getting the Most From Your Voiceover Session.
1- Choose Wisely – Who you choose to deliver your message is the first and possibly most critical decision you’ll make. The voice should personify the attitude and style of your company, product or character and should relate to your target demographic. Keep in mind that the talent should be able to communicate your message quickly and efficiently. Choose a voice talent who can deliver your copy with few mistakes or pickups. Just because audio editing is easier and faster than ever, doesn’t mean extensive editing should be required to get the result you want.

2- Check Your Script – Before your session, read your script out loud and use a stopwatch to time it. This process will help ensure that you’ve fixed any mistakes, grammatical errors and any other stumbling blocks that the voice over talent may encounter. Using a stopwatch while reading aloud will prepare you for the possibility that you may need to cut or add copy to fit your message within the time limits required for radio and TV commercials.

3- Formatting – The way your script is formatted plays a big role in the ease in which it can be read. Double spacing allows room to make copy edits when necessary. Use of punctuation is a must. Also be aware that WRITING IN ALL CAPS IS MORE DIFFICULT TO READ. Only use ALL CAPS, bold type, italics or underlines to indicate emphasis.

4- Numbers – Using actual numbers (1,2,3) rather than writing numbers (one, two, three) is helpful. However, in the case of a monetary value that is complicated to say or that can be said multiple ways, writing the number the way you would like it said is best.

5- Communicate – Communication is what this is all about… right? Let your voice talent know right from the beginning what your ideas are for your script and the approach you had in mind. Most of the time, the copy itself will indicate what approach the voice talent will need to take. Other times several approaches could be considered viable options. This brings us to…

6- Be Flexible – While you were getting ready for the session to begin, the voice talent was also preparing. Professional voice over talent will look over the script, read it to themselves, then read it aloud and anticipate what delivery will be best based on the script, the client, and any written direction that may have been provided. Oftentimes, the talent’s approach will be very close to what you were thinking. However, the talent may also deliver something slightly different or even completely unexpected. These differences could lead to results that are better then what you had imagined. Be open to what the talent brings to the table. Its one of the reasons you chose him or her.

7- Ask For Help – The audio engineers, producers and the voice talent are all there to help you get the most out of your voiceover session. Everyone involved wants the production to be a success. If while in a recording session, you are not quite sure about direction, script construction, copy edits, or have questions or concerns about the audio itself, then allow the talents and experience of these professionals to help you achieve your goals.

8- Be Specific – Vague terminology is confusing and not very helpful since it often requires further explanation anyway. “Make it blue” is not a clear direction and can be interpreted in several ways. “Bigger smile” and “descend on that word” are examples of very precise directions that the voice over talent can easily understand.

9- Keep it Positive – Everyone appreciates positive feedback. If the talent is communicating your message effectively, let them know it.

10- Make It Fun – The best and most memorable recording sessions are the fun sessions. They usually involve fun, creative scripts and people who love listening to their productions come to life. Even if the script is informational and straightforward, there is no reason the session can’t be fun while the work gets done. Sometimes, it can be so much fun… it seems strange to call it work. How’s that for getting the most out of a session?

Filed Under: Voiceover Tips & Advice Tagged With: 4VO, audio engineers, Dan Friedman, Sound Advice Voiceover From an Audio Engineer's Perspective, sound4vo, VO, voice over, voiceover book, voiceover session, voiceover talent

Room Acoustics Series (Part 2)… Thanks Recording Magazine!

June 28, 2011 by Dan Friedman

Recording Magazine sends out a newsletter to its subscribers every few weeks. The newsletter is (coincidentally) titled “Sound Advice” and this month it features the second in a series about room acoustics. As you will read, room acoustics is one of the biggest concerns for Recording Magazine readers. I know that this is also a big issue for those of you in the voiceover world. Like I did last month, I asked permission to reprint the series (and will ask to reprint the others in the series as well) so that those of you with home studios can also benefit from the information. I want to personally thank Brent Heintz, VP/Associate Publisher for granting permission, allowing me to share this great information with you.

Please visit Recording Magazine‘s website and their Facebook Page.

Catch up or skip ahead: Part 1, Part 3, Part 4, Part 5, Part 6, Part 7, Part 8.

Here is the second newsletter in the series on Room Acoustics:

Welcome to Sound Advice on Acoustics! Last time we sketched out the basic properties of sound: amplitude, frequency, and wavelength. And we talked about how sound waves in air interact with one another to make certain frequencies louder and others softer at various places in the room. Armed with those basic terms and ideas, it’s time for us to look at some real-world problems…

Low-frequency energy that is unevenly distributed is one of the main problems. When you apply the wavelength formula you’ll see that the wavelengths of bass notes easily exceed the measurements of typical rooms. Example: 55 Hz (the open A string on a bass) works out as follows: 1130 ÷ 55 = 20.54 feet. Few control rooms are deeper than 20’6″. When long waves approach and exceed the dimensions of the room, they are forced to fold back onto themselves, and the resulting cancellations and reinforcements will be localized to specific areas in the room. This results in clearly audible artifacts that must be dealt with. Fortunately, these interferences can be calculated and mapped out in the room.

In analyzing a room, the first aspect to consider is its overall size, as this will determine the limit of low-frequency support. Frequencies whose wavelengths are longer than half the longest dimension in a room are said to be unsupported in that room.

Take a small room with dimensions of 1’L x 10’W x 8’H. The formula 1130 ÷ 2L (where 1130 = the speed of sound in feet/sec, and 2L = the longest room dimension multiplied by two) gives us the lowest supported frequency in that room: 1130 ÷ 24 = 47.08, about 47 Hz (for reference, the fundamental of the lowest note on a 4-string bass is about 42 Hz). Frequencies below this will be unsupported, which doesn’t mean that they can’t exist in that room, but that they will be weaker from lack of resonant support (reinforcement by room resonances).

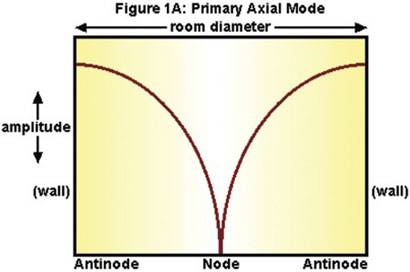
A special problem occurs with the frequency whose wavelength is exactly 1130 ÷ 2L; this will produce what’s called a standing wave or mode. This is a room resonance that occurs when a wave reflects between two parallel surfaces in the room. As the wave is contained by the room, a stationary distribution of reinforcements (boosts in level) and cancellations (null points) will be established as shown in Figure 1A.

Room Acoustics series, figure 1

The reinforcements (maximum pressure) of the standing wave occur at the walls (the points of reflection), while a cancellation occurs midway between the walls. This happens between every pair of parallel walls in the room (there are three pairs in a rectangular room, front/rear walls, side walls, and floor/ceiling).

The locations in the room where the sound wave is canceled are called nodes (in this example the midway point); the areas of maximum reinforcement are called antinodes (in this example at the walls). If you generated a sine wave test tone at that frequency, stood at one wall, and slowly walked to the other wall, you would hear that tone drop in level as you passed the midway point and increase in level again as you approached the opposite wall.

So far we’ve established the first modal frequency in that room, and obviously there are at least three, one for each pair of parallel surfaces. That’s only the beginning—for each room dimension, there are additional modal frequencies.

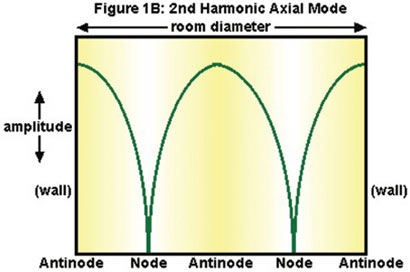
The second harmonic of this first mode will be twice that frequency and therefore half the wavelength—a sound wave of this frequency will also form a standing wave with discrete node and antinode areas. Since the wavelength of the second harmonic is half that of the fundamental’s, the peaks and nulls will be more closely spaced (by half), as illustrated in Figure 1B.

Room Acoustics series, figure 2

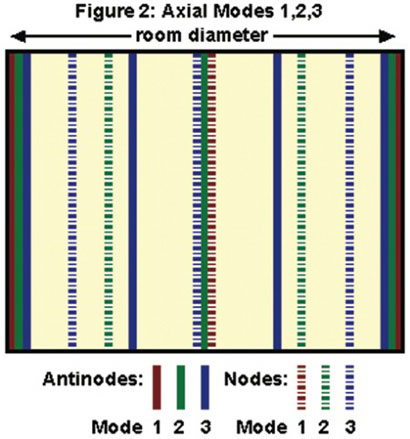
Once again (as always), the standing wave’s reinforcements occur at the walls, but now another reinforcement (Antinode) occurs halfway between, with cancellations (Nodes) a quarter of the way out from each wall. Again, remember this happens for each of the three parallel surfaces in the room.

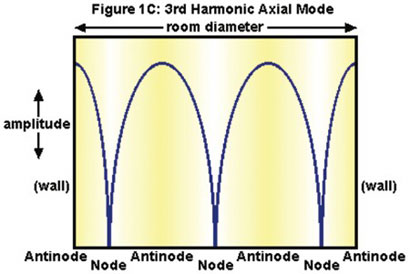
The same effect happens at the third harmonic (3 x the frequency, 1/3 the wavelength) of that initial modal frequency, (Figure 1C), and so on up, with more closely spaced nodes and antinodes. Eventually the wavelengths will become short enough that the reduced strength, greater density, and closer spacing of the various nodes and antinodes will tend to average out rather than be audible at specific spots in the room; this will happen gradually, beginning at around 300–400 Hz.

Room Acoustics series, figure 3

Figure 2 shows a plot of where the nodes and antinodes of the first three of these modes occur in the room. If you plotted each of the three pairs of parallel surfaces and overlaid them, you’d see the specific layout and intersections of the various nodes and antinodes. The particular frequencies affected would of course depend on the room dimensions.

Room Acoustic series, figure 4

And that’s not all—the modes described so far are only one of three types that exist in any rectangular room. These modes, which occur between two parallel surfaces, are called axial modes. They are by far the strongest and most problematic, but they’re not alone. Standing waves also result when sound waves bounce around four surfaces (see Figure 3)—these are called tangential modes; they have half the energy of the axial modes. Finally, oblique modes arise from sound waves that bounce around all six surfaces; these have one-quarter the energy of the axial modes.

There will always be a buildup of bass at each wall, and in the corners, where the different modes intersect, generating even more low-frequency energy; the three-way intersection of two walls and ceiling or floor will have the greatest amount of low-end buildup.

To fully analyze the low-frequency behavior in a room, all of these modes would have to be calculated and mapped out, but this is difficult to do without test equipment, and since the axial modes are by far the most prominent, we’ll focus on those to create some representative charts of modal behavior in typical rooms. We’ll do that next time… see you then!

Filed Under: Audio Production, Studio & Gear

Now on VoiceOverXtra!

June 23, 2011 by Dan Friedman

VoiceOver Xtra

http://voiceoverxtra.com/article.htm?id=e6nf5bfc

Filed Under: Sound4VO News

Interview with Bill DeWees

June 19, 2011 by Dan Friedman

logo 4voI had a great time doing an Interview with Bill DeWees. Check it out and look for more from Bill on his VoiceOverExpert You Tube Channel.


Thank you, Bill!

Filed Under: Sound4VO News Tagged With: 4VO, Bill DeWees, Dan Friedman, home studio, microphone, Recording, Sound Advice Voiceover From an Audio Engineer's Perspective, VO, voiceover book

The Best Voice Over Coach is… Your Ears!

June 13, 2011 by Dan Friedman

home studioRecently there was a post on the Voice Artists United Facebook page that discussed coaches. The talent (who I do not know) wrote that he was discouraged by some comments that his most recent coach had made. At the time I write this, the post has 48 comments with some very popular names in the industry weighing in.

Don’t let the title of this article fool you. Getting some VO coaching is critical to your career. At a minimum, good coaches teach breathing, script construction, industry terminology, how to take direction and the mechanics of different styles and deliveries. They should also be teaching microphone technique, basic equipment needs and (hopefully) studio etiquette. Many coaches offer additional instruction on other topics related to voice over such as marketing, basic audio recording and audio editing. Coaches provide encouragement, direction and might even be able to get you a gig or two.

Voice coaches can be many things and their role and importance in your career can change as your career grows and progresses. The most important job of the coach is to be completely honest when evaluating your abilities and offering feedback. This feedback is important. But, at some point, you have to learn to hear “it” for yourself. The truth of the matter is, you have the best coach with you at all times… your ears.

Voice over coaches are indirectly trying to get every student to open their ears and truly listen. Learning to hear the differences and nuances in attitude, style, pacing, inflection, emphasis, amount of smile, etc. is, in my opinion, the real secret to doing voice over well. Almost anyone can learn to do these things with their voice if they are aware of what to do and practice doing it. However, being able to hear the subtle nuances of your delivery is what enables you to stop simply playing with words and allows you to become the communicator that every serious voice talent should work toward becoming.

Coaching deliberately teaches the techniques that get the brain, mouth and voice working together to physically do what needs to be done. But many voice talent fall short by failing to truly engage their ears. This is one reason why so many voiceovers are pieced together line by line by the engineers, whose job it is to use their ears everyday. While this is common in today’s world of fast digital editing and even clients have gotten comfortable working this way, this is not exactly how it is meant to be.

You have two ears and one mouth to remind you to use your ears twice as much. Record, read, playback, listen, adjust accordingly and do it over and over again. Learn to use your ears, use them purposefully and over time you will learn to trust them. You will know immediately what is working and what isn’t. You will learn to fine tune and self-correct. While you may still want to get professional voiceover coaching from time to time, for the most part, you will be your own coach. You will no longer need to feel discouraged by harsh critiques, or pay someone to give them to you. Instead you will get paid to take direction and be proud of the great work you’ve done for your clients.

Filed Under: Voiceover Tips & Advice Tagged With: 4VO, Dan Friedman, home studio, microphone, Recording, sound4vo, VO, VO coaching, voiceover

  • « Go to Previous Page
  • Page 1
  • Interim pages omitted …
  • Page 14
  • Page 15
  • Page 16
  • Page 17
  • Page 18
  • Interim pages omitted …
  • Page 21
  • Go to Next Page »

Primary Sidebar

Search Blog

Categories

Want to see how well we work together first? LET’S DO IT!!

Book a Single Session
Book a FREE Meet & Greet

Follow Sound4VO

Dan Friedman Voice Over Coach & Demo Producer Tiktok

Tip Jar

Have questions on anything related to voiceover? Dan is available for email consultations at no charge. Ask away! If he's able to help you with your problem, tips are greatly appreciated... Use the "tip jar" below to show Dan the love!

Dan Friedman Voice Over Coach & Demo Producer Tiktok

[email protected]

828.551.0891

Dan Friedman Voice Over Coach & Demo Producer Zen and the art of Voiceover Audiobook Cover Img
Buy Now
Dan Friedman Voice Over Coach & Demo Producer Sound Advice Cover Img
Buy Now

RLM CERTIFIED MASTER COACH Since 2021

Dan Friedman Voice Over Coach & Demo Producer RLMC Logo

©2025 Dan Friedman Sound4VO // Voice Over Site by Voice Actor Websites

MENU
  • Home
  • About
  • Demos
  • Coaching4VO
  • Books
  • Services
  • Testimonials
  • Sound4VO Blog
  • Merch
  • Contact