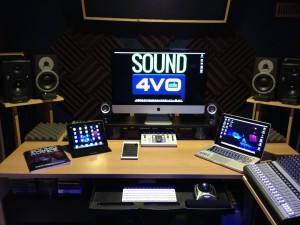
 It is as simple as this… if you want to work in voiceover, you need a home studio. I know it seems hard to believe, but it is true; the days of being chauffeured around from studio to studio where you talk for a few minutes and line your pockets with cash are long gone… and have been for years. More recently, the need for racks filled with expensive magic audio boxes has also become unnecessary. Today, with nothing more than a USB microphone and an iPad, you can be recording high quality audio in no time. Well… sort of.
In this final installment, of the three part series(part 1) (part 2), I’ll discuss a third type of voiceover recording setup. In this setup… the sky is the limit! Keep in mind, that in any recording setup, there are at least two common denominators that will remain constant. They are, and always will be, the two most important factors in your sound and your success… you and the space in which you record. The cheapest setup can sound great (or at the very least… useable) with an amazing talent, performing in a great sounding space. A great performance on expensive equipment can be useless in a noisy or terrible sounding space.
With that in mind, let’s checkout setup number three.
Voiceover Recording Setup 3
While setup 1 and setup 2 are portable, portability was never the goal. Consistency from one session to the next is a critical element to success in voiceover. Therefore, remaining in one space is preferred. Recording setup 3 is stationary, and there are other big changes that will have you prepared for anything. One of the biggest changes is incorporating a mixer into the setup, which will allow you to include phone patch and (when you are ready and if the technology is available where you are geographically) an ISDN codec.
I could very easily have added them to the other two setups but with setup 3, the other big change is the necessity for studio monitors (speakers). Nobody should be listening critically to audio on headphones alone. Headphones, by design, do not give you a true picture of how we hear sound in the real world. We hear with both of our ears in combination, not with the left and right sides in isolation. Studio monitors are a personal preference. Whichever monitors you choose, you should give yourself some time to get familiar with their characteristics. More importantly, they should be comfortable for you to listen on over long periods of time.
Most components listed in setup 2 will remain the same for this setup. Instead of a laptop, a desktop computer will serve as the focal point for this studio. This will likely increase your storage capacity and speed. It will also give you more visual real estate due to a bigger computer monitor (the screen) and you can get even more real estate by adding an additional monitor.
With this setup, the sky is the limit when it comes to options, components and prices. Upgrades are possible in all areas of your audio chain. While the $300 microphone may still be perfect for you, it may be worthwhile to explore more expensive options. The same is true for your preamp, interface, cables and… well… everything. The price ranges I’ve listed below, now reflect the cost of higher priced equipment that can be found in many home voiceover studios.
Overall estimated cost:
High quality desktop computer w/OS and basic software – $1500 – $3000
DAW – $0 – $1800 (Audacity and “lite” DAW software = $0, full versions = $1800)
Separate Preamp – $500 – $2500
USB/Firewire Preamp or standalone AD/DA Converter – $150 – $2500
Mixer – $100 – $1000
Standard (XLR) LDC microphone – $300 – $1200
ISDN Codec or Source Connect Pro Software – $1000 – $3000
Phone patch – $175 – $500
Headphones – $100
Studio Monitors – $300 – $1600
Cables/adaptors – $50 – $200
Heavy duty microphone stand w/boom – $150
Setup 3 cost = aprox. $4325 – $17,550
Your home studio. For just over $1000, which was discussed in part one of this series, all the way up to over $17,000 (and beyond) you can be recording, editing and producing voiceovers. Note that these costs don’t take into consideration acoustic treatment or sound proofing (the prices for Whisper Rooms, for example, begin at just over $3000). Furthermore, if you’re interested in doing full production and mixing, you’ll need music, sound effects and audio processing plugins to go along with your DAW software.
Some of the items listed can be combined and many of the items are transferable from setup to setup, allowing your studio to build upon itself and grow with your career. Also, it is more likely that setup 1 could be the last setup you buy rather than your first. The portable studio is far more useful to voice talent who’ve been working at this awhile and are in higher demand.
So, now that you’ve gotten your studio budget figured out… start working on your budget for coaching, marketing materials, website, travel to industry events and your very own… chauffeured limousine. 😉


