Recording Magazine sends out a newsletter to its subscribers every few weeks. The newsletter is (coincidentally) titled “Sound Advice” and this month it features the eighth in a series about room acoustics. Room acoustics is one of the biggest concerns for Recording Magazine readers. I know that this is also a big issue for those of you in the voiceover world. I asked permission to reprint this newsletter (and will ask to reprint the others in the series as well) so that those of you with home studios can also benefit from the information. I want to personally thank Brent Heintz, VP/Associate Publisher for granting permission, allowing me to share this great information with you.
Please visit Recording Magazine‘s website and their Facebook Page.
Catch up on the series: Part 1, Part 2, Part 3, Part 4, Part 5, Part 6, Part 7.
Here is the eighth newsletter in the series on Room Acoustics:
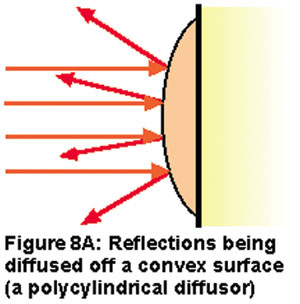
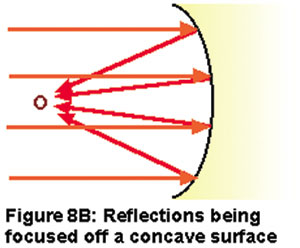
Welcome to Sound Advice on Acoustics! Last time we discussed how reflections from walls and ceiling and floor at the front of the room could be spotted and damped; now it’s time to look at the rest of the room, and one critical piece of studio furniture…The potential problem in having a live rear end of a control room is that too much reflected energy may be directed straight back at the mix position. To avoid this, various techniques have been used to diffuse, or spread out, this reflected sound. One of the simplest and most traditional is the use of a curved rear wall (see Figure 8A).
Another approach is to create an irregular surface on the rear walls, to send reflections in many different directions, effectively diffusing the ambient sound field. A wall covering consisting of various sized blocks or grooves can be employed to accomplish this; even a bookcase filled with different-sized books can be pressed into service in a pinch. However, the best results will be achieved when this kind of surface treatment is not just random, but specifically designed to diffuse sound most effectively at a wide range of frequencies.
More recent computer-assisted designs of this type are able to not only distribute reflections around the room, but also deliver an optimum balance and distribution of all the diffused reflected frequencies. There are many types of these diffusors available. One good example of this approach is a quadratic residue diffusor. This is a panel made up of what appears to be a series of blocks or grooves. They’re not just randomly arranged to simply spread out reflections—their arrangement and depths are determined mathematically by a quadratic residue sequence (there’s a mouthful!), to provide the greatest degree of diffusion and the most even distribution of reflected sound.
Fortunately, for those who tend to cringe at anything more than long division, diffusors of this type are available commercially. Though not cheap, they are very effective and recommended if the budget allows.
Room boundaries are not the only surfaces that can generate reflections. How about that great big console right in front of you? Reflections off the console or work surface and other studio gear like racks can also contribute to a loss of clarity.
Console reflections in particular can be problematic, since they originate right in front of the listening position and therefore can be quite strong. If the speakers are wall- or soffit- mounted, an absorbent “hood” can sometimes be placed behind and over the meter bridge to prevent sound waves from hitting the console surface. Reflections from console-top monitors are more difficult to eliminate, but at least choosing monitors with narrow, controlled vertical dispersion and angling them carefully will beam less high-frequency sound down to be reflected off the console surface.
Keep other gear out of the direct path of sound from the speakers—use lower racks, or position tall racks to the rear of the mix position. The sharp edges of most racks diffract sound (diffraction is a change in direction of a sound wave caused by an obstacle)—rounding off such sharp edges helps diffuse such reflections. After the room is initially set up and tuned, checking the acoustics as additional pieces of gear are installed can help to identify and prevent new problems from being introduced.
Another approach to minimizing the problematic effects of strong early reflections is to set up the mix position no more than 3 feet or so from the speakers, placing the listener in the speakers’ “near-field.” Theoretically, in this zone, the direct sound from the speakers should be predominant over reflections from other surfaces, providing a more neutral response even in a room with less than optimal acoustics.
This approach is called Near-Field Monitoring™, a concept that was trademarked by industry veteran Ed Long. It is usually implemented via the use of console-top monitors. This does work fairly well, the sound in this near-field area is often somewhat smoother than sound from the same speakers in the far-field (at greater listening distances) of the same room.
This type of setup is often recommended for studios where, for one reason or another, room treatments are not able to completely control reflection issues (which includes most small studios). However, near-field monitoring is not a panacea for acoustic problems—standing wave effects will still be present, and as noted above, the possibility of close strong reflections from the console itself can still potentially compromise monitoring accuracy.
Next time we’ll wrap up our introductory discussion with a look at live rooms for tracking and a list of references you can look at. See you then!


