Today, every voice actor needs to have the capability to record themselves. No matter which equipment you use, you want to be able to use it to the best of its ability. Traditionally, this has been the job of the recording engineer. When taking on the job of being a recording engineer, your most important task as a voice actor is to capture your audio with the highest quality possible. This doesn’t mean you have to increase your sampling and bit rates to astronomical numbers. That just isn’t necessary for voice recording. 44.1khz and 16 bit is generally fine. However, it does start by setting good levels.
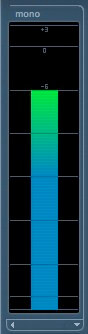
Good levels, generally hover between -6db and -12db on your audio meters. So, how do you get there? First, every script you read, deserves individual attention as each is different and you may be doing a variety of different styles of reads as you go about your day. Therefore, you should check your levels with each new delivery.

It is best to set levels using your gain knob on your preamp/interface. It is the most obvious place to make your changes and also the most noticeable when something has been changed.
Begin by stepping up to the microphone using the correct distance, or proximity, appropriate for the script. Some scripts are intimate, others less so.
Read your script exactly as you intend to perform it. You should already have figured out how you intend to do that.
Turn your gain knob clockwise to increase the level from the preamp, or counterclockwise to reduce the gain. Watch the meters on your DAW and also (if available) on your preamp. When your levels are averaging in that -12 to -6db range in your DAW, you are good to go. You may have some peaks that go above -6db. That is okay, as long as you keep them below 0 (or, for safety around -2db.) You’ll always want to listen to be sure you have a clean signal that is free of distortion.
Setting levels in this range consistently, may eliminate the need to use tools such as normalizing. It also ensures that you are using all of the digital 1’s and 0’s available to you in digital recording. Setting levels properly is also critical to determine your noise floor, which is any sound remaining that exists within the room or that is being produced by the equipment once your levels have been set properly and you have stopped talking.
It is important to note that USB microphones, don’t often have preamp controls. Therefore they are limiting when it comes to being able to control levels directly from your hardware. XLR microphones with a separate preamp/interface are best for both control and flexibility.
If you have any questions or need further assistance, I am available for studio consultation and performance coaching.


